

 Set up docs MCP
The quickest and easiest way to get up and running with ClickHouse is to create a new service in ClickHouse Cloud. In this quick start guide, we’ll get you setup in three easy steps.
Create a ClickHouse service
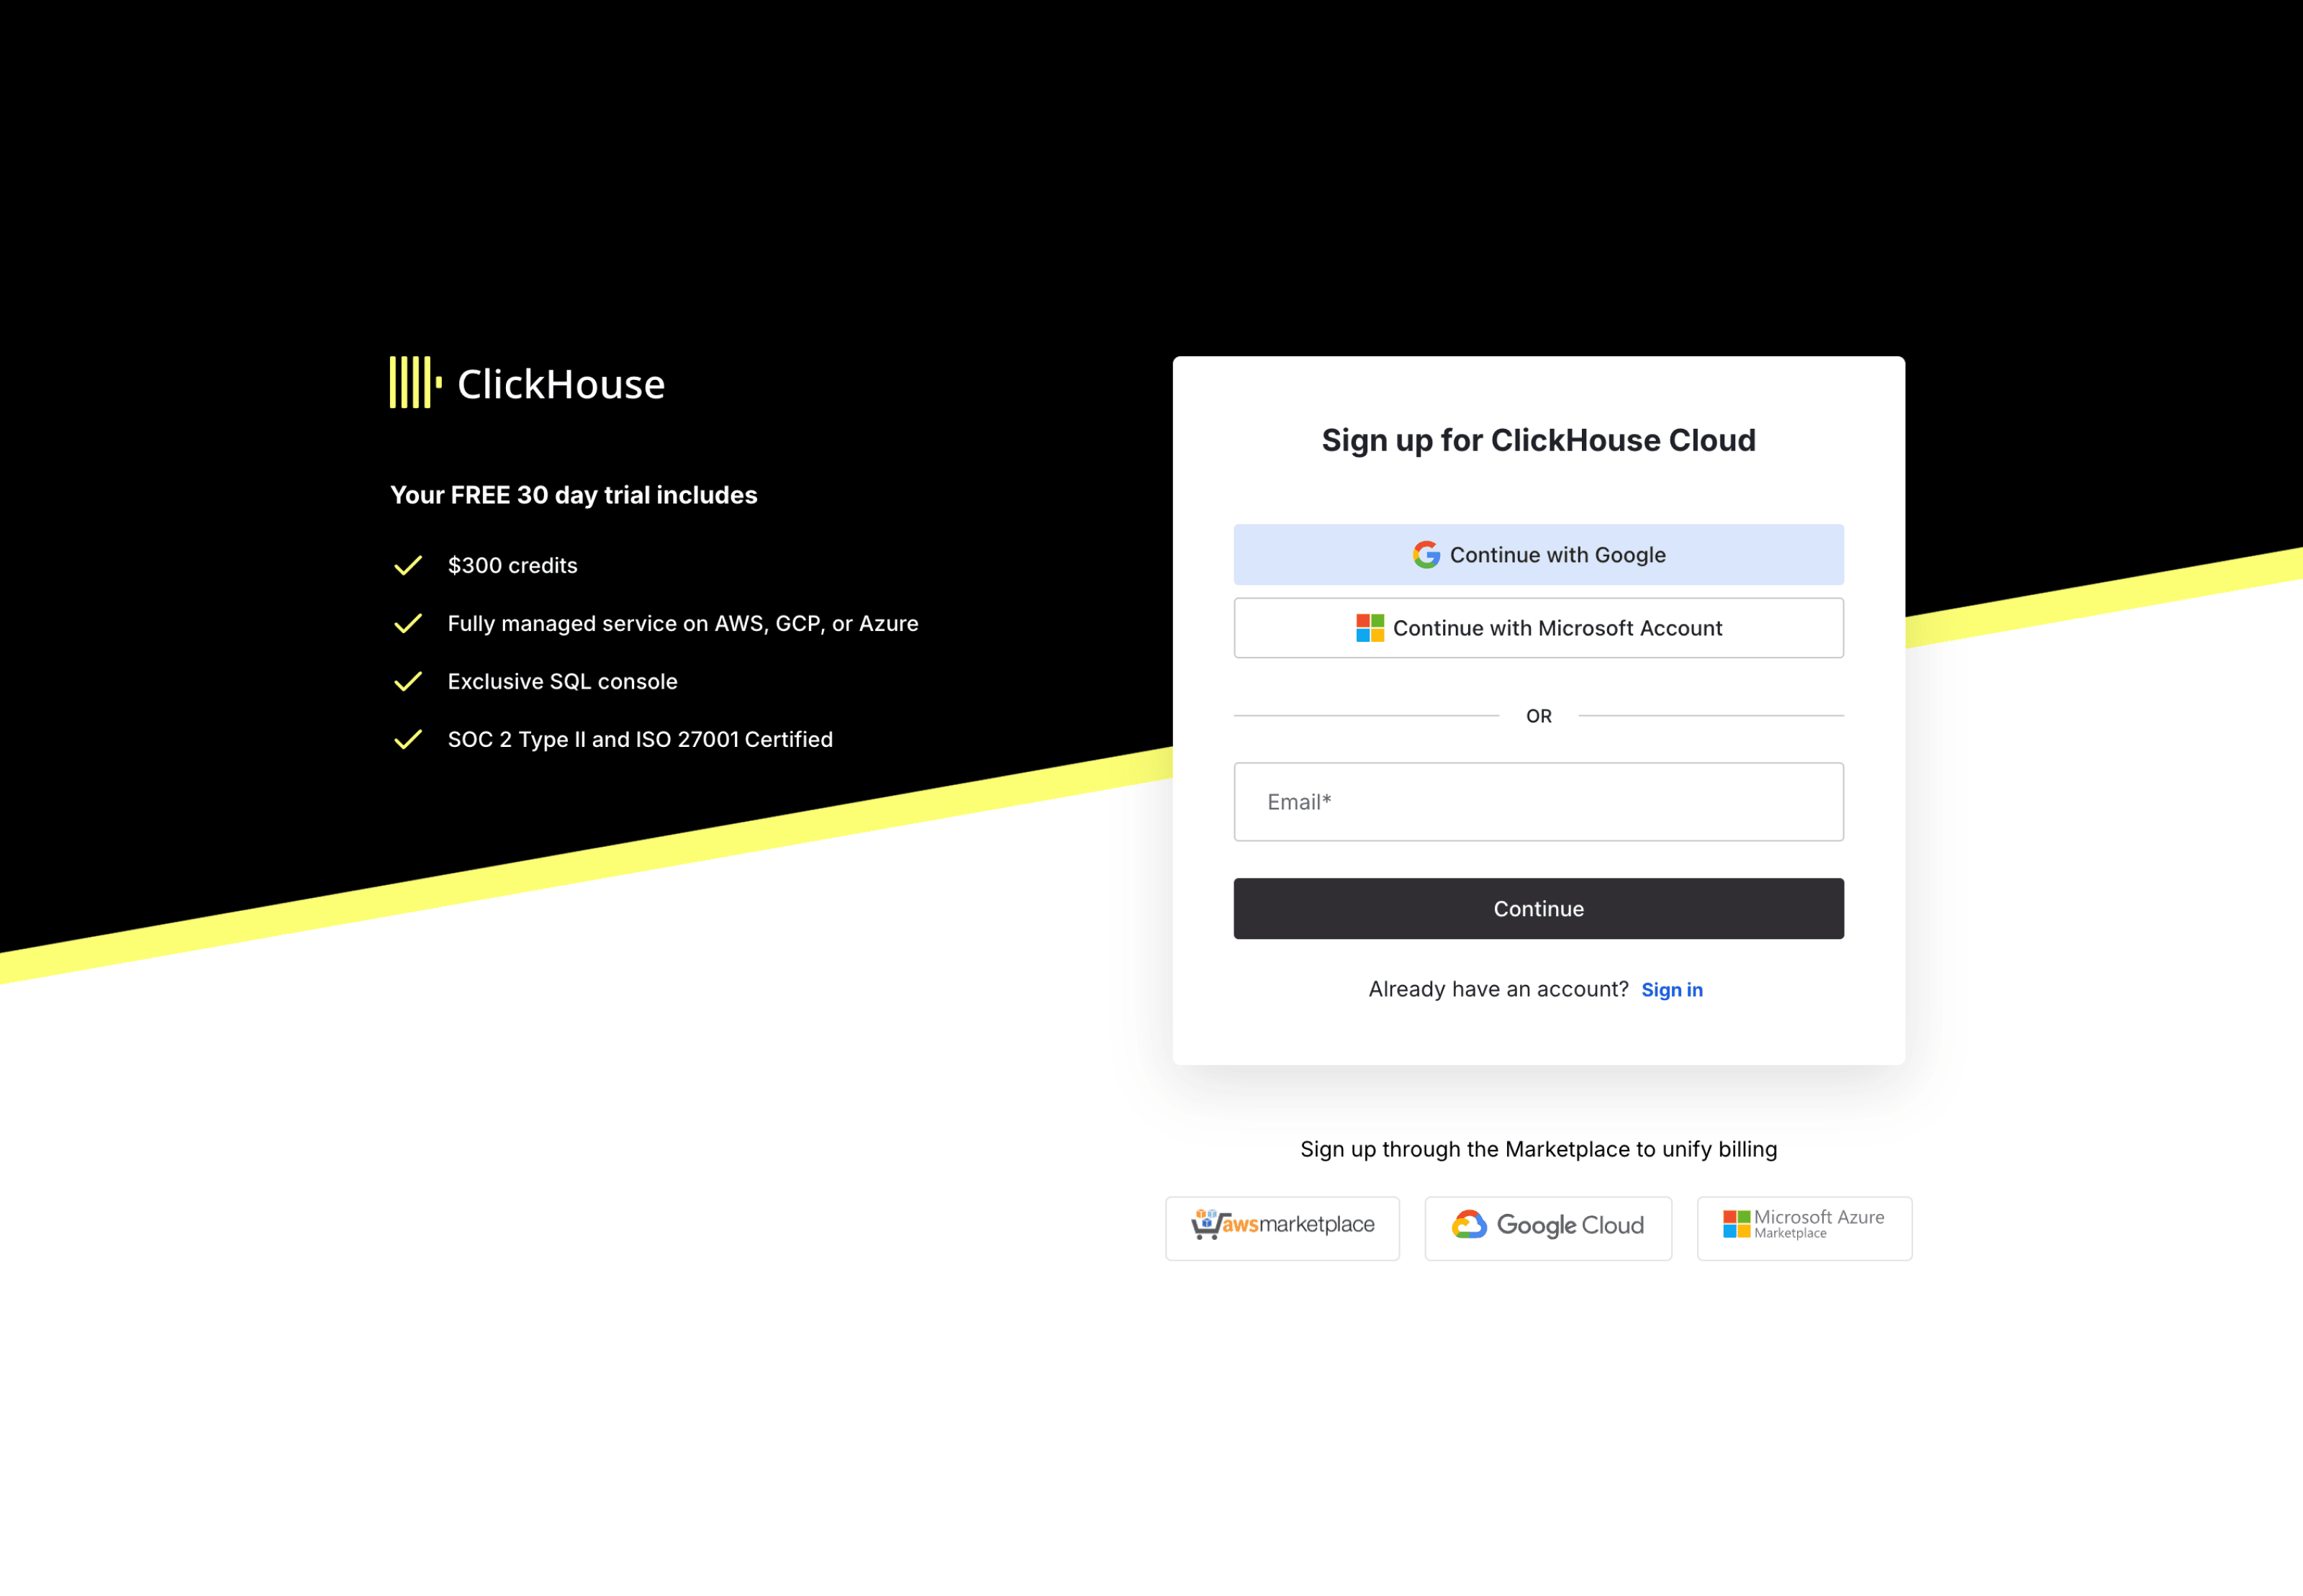
To create a free ClickHouse service in ClickHouse Cloud, you just need to sign up by completing the following steps:
- Create an account on the sign-up page
- You can choose to sign up using your email or via Google SSO, Microsoft SSO, AWS Marketplace, Google Cloud or Microsoft Azure
- If you sign up using an email and password, remember to verify your email address within the next 24h via the link you receive in your email
- Login using the username and password you just created
Once you’re logged in, ClickHouse Cloud starts the onboarding wizard which walks you through creating a new ClickHouse service. Select your desired region for deploying the service, and give your new service a name:
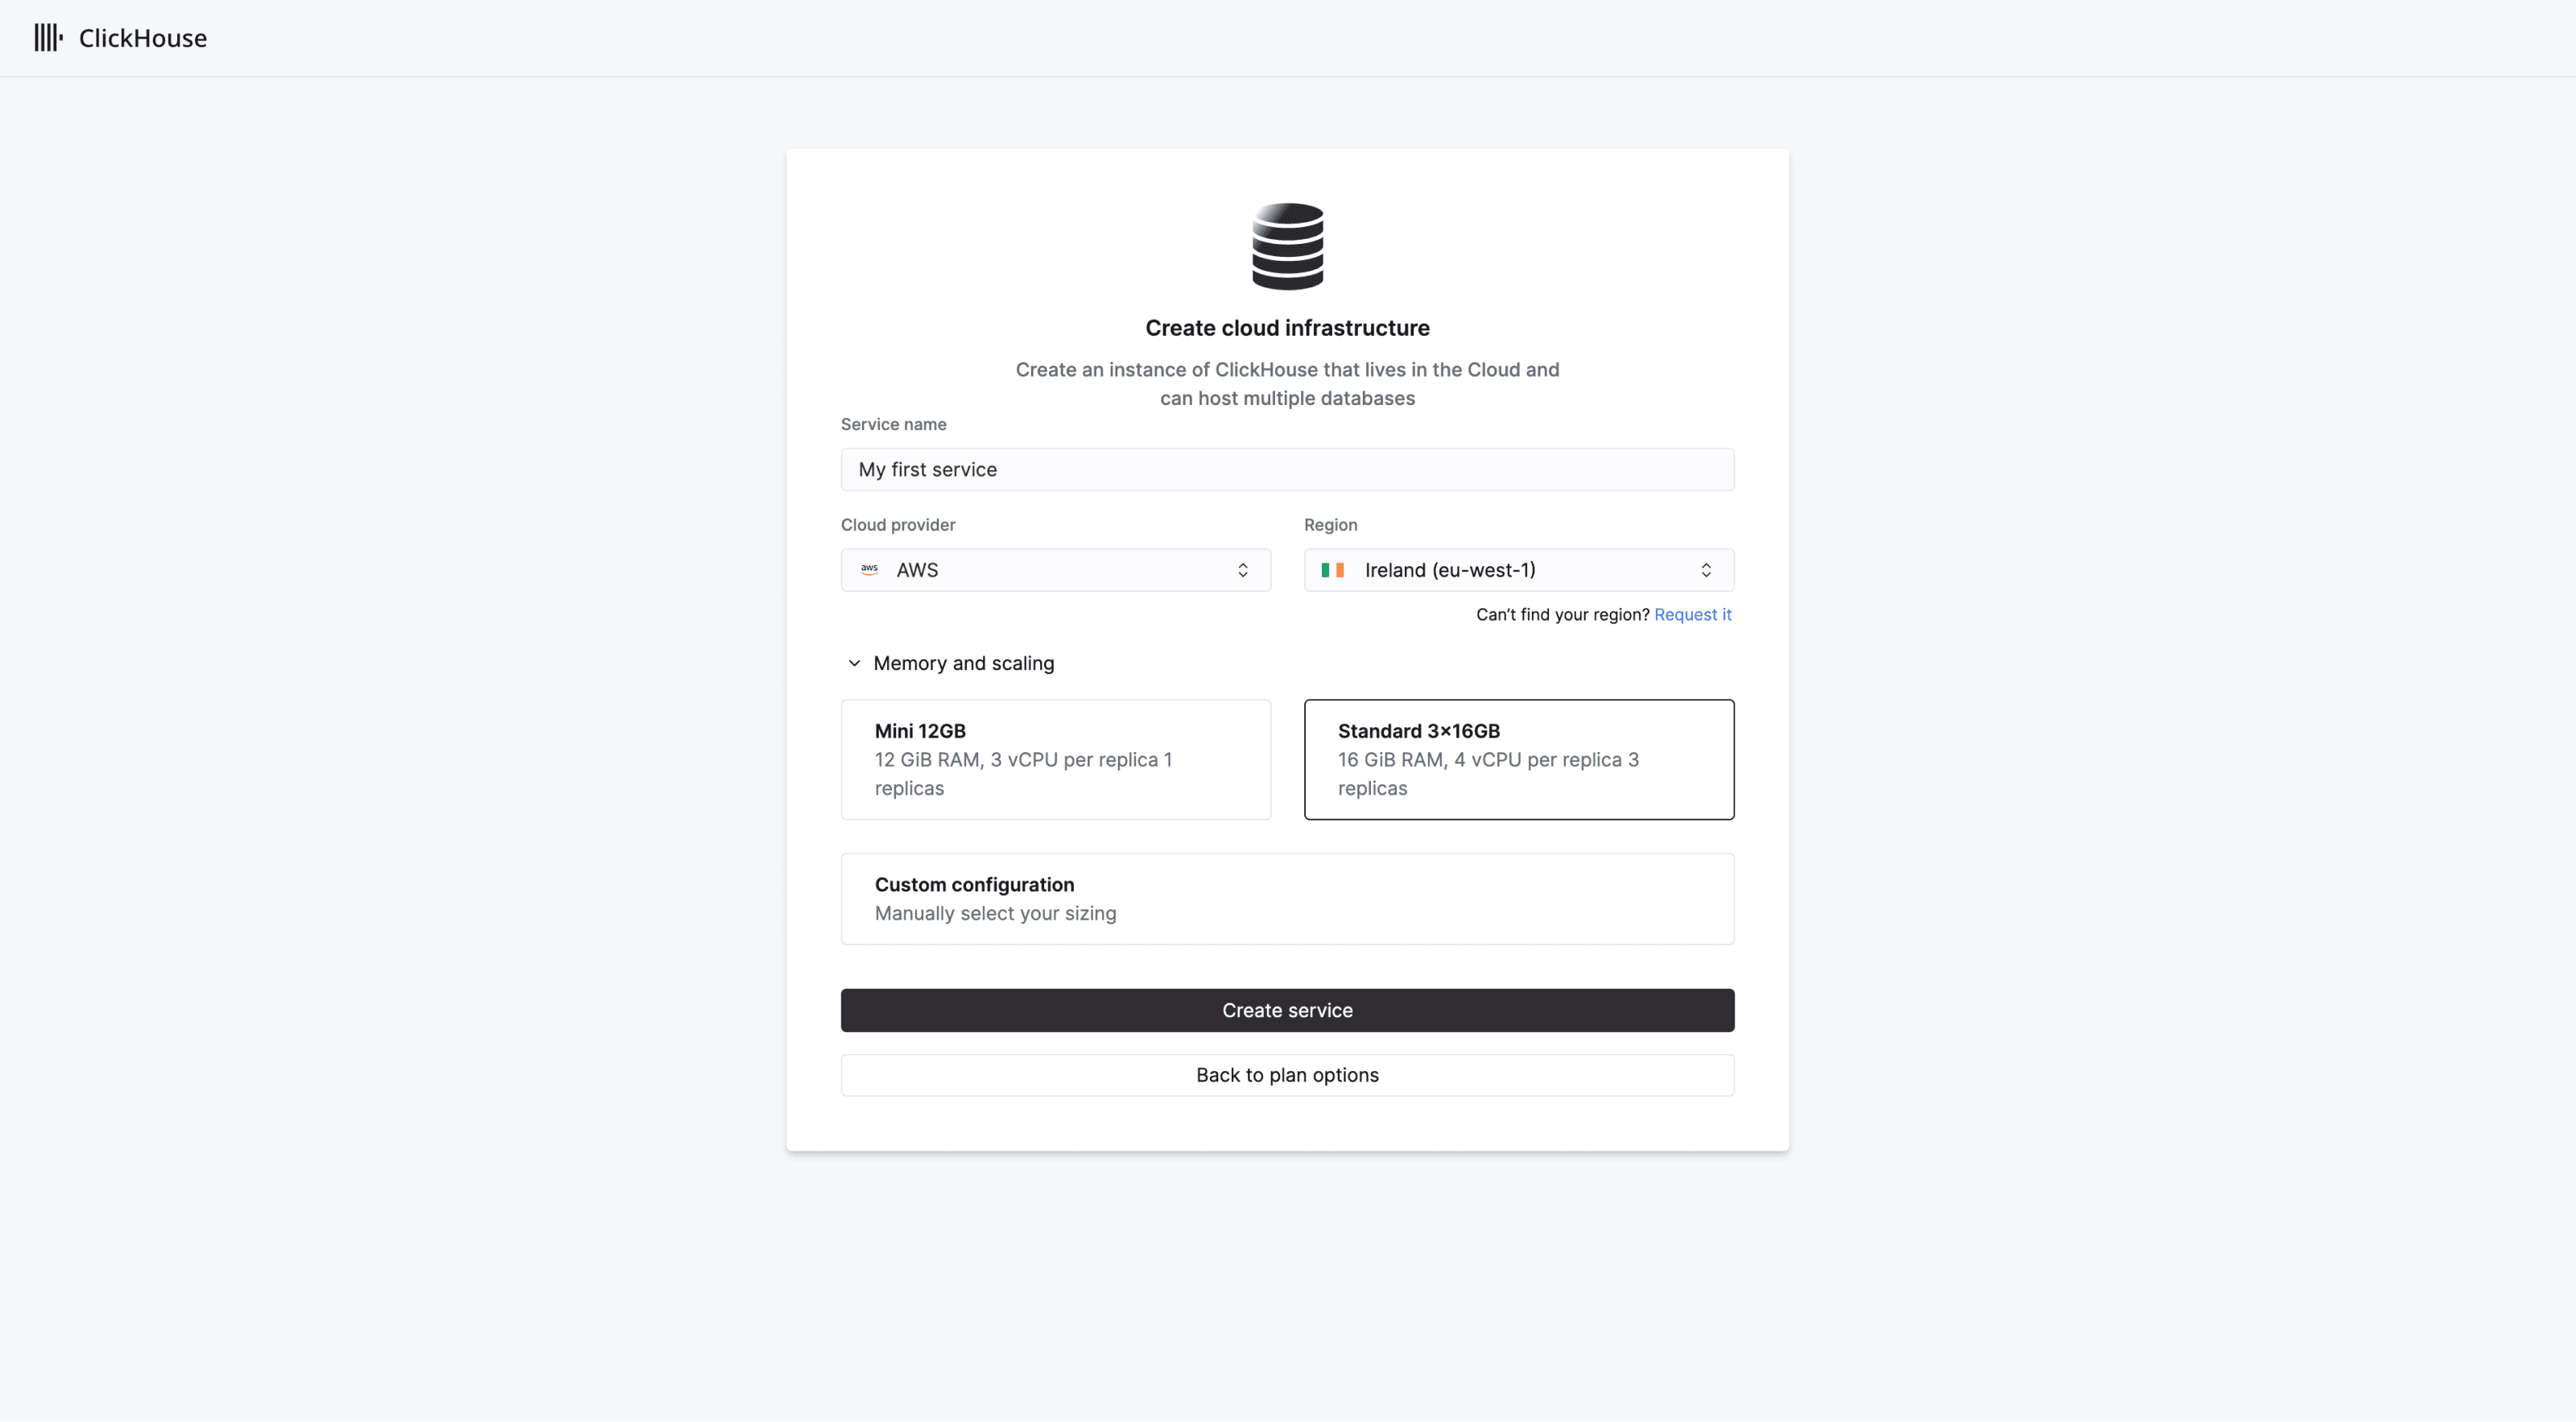
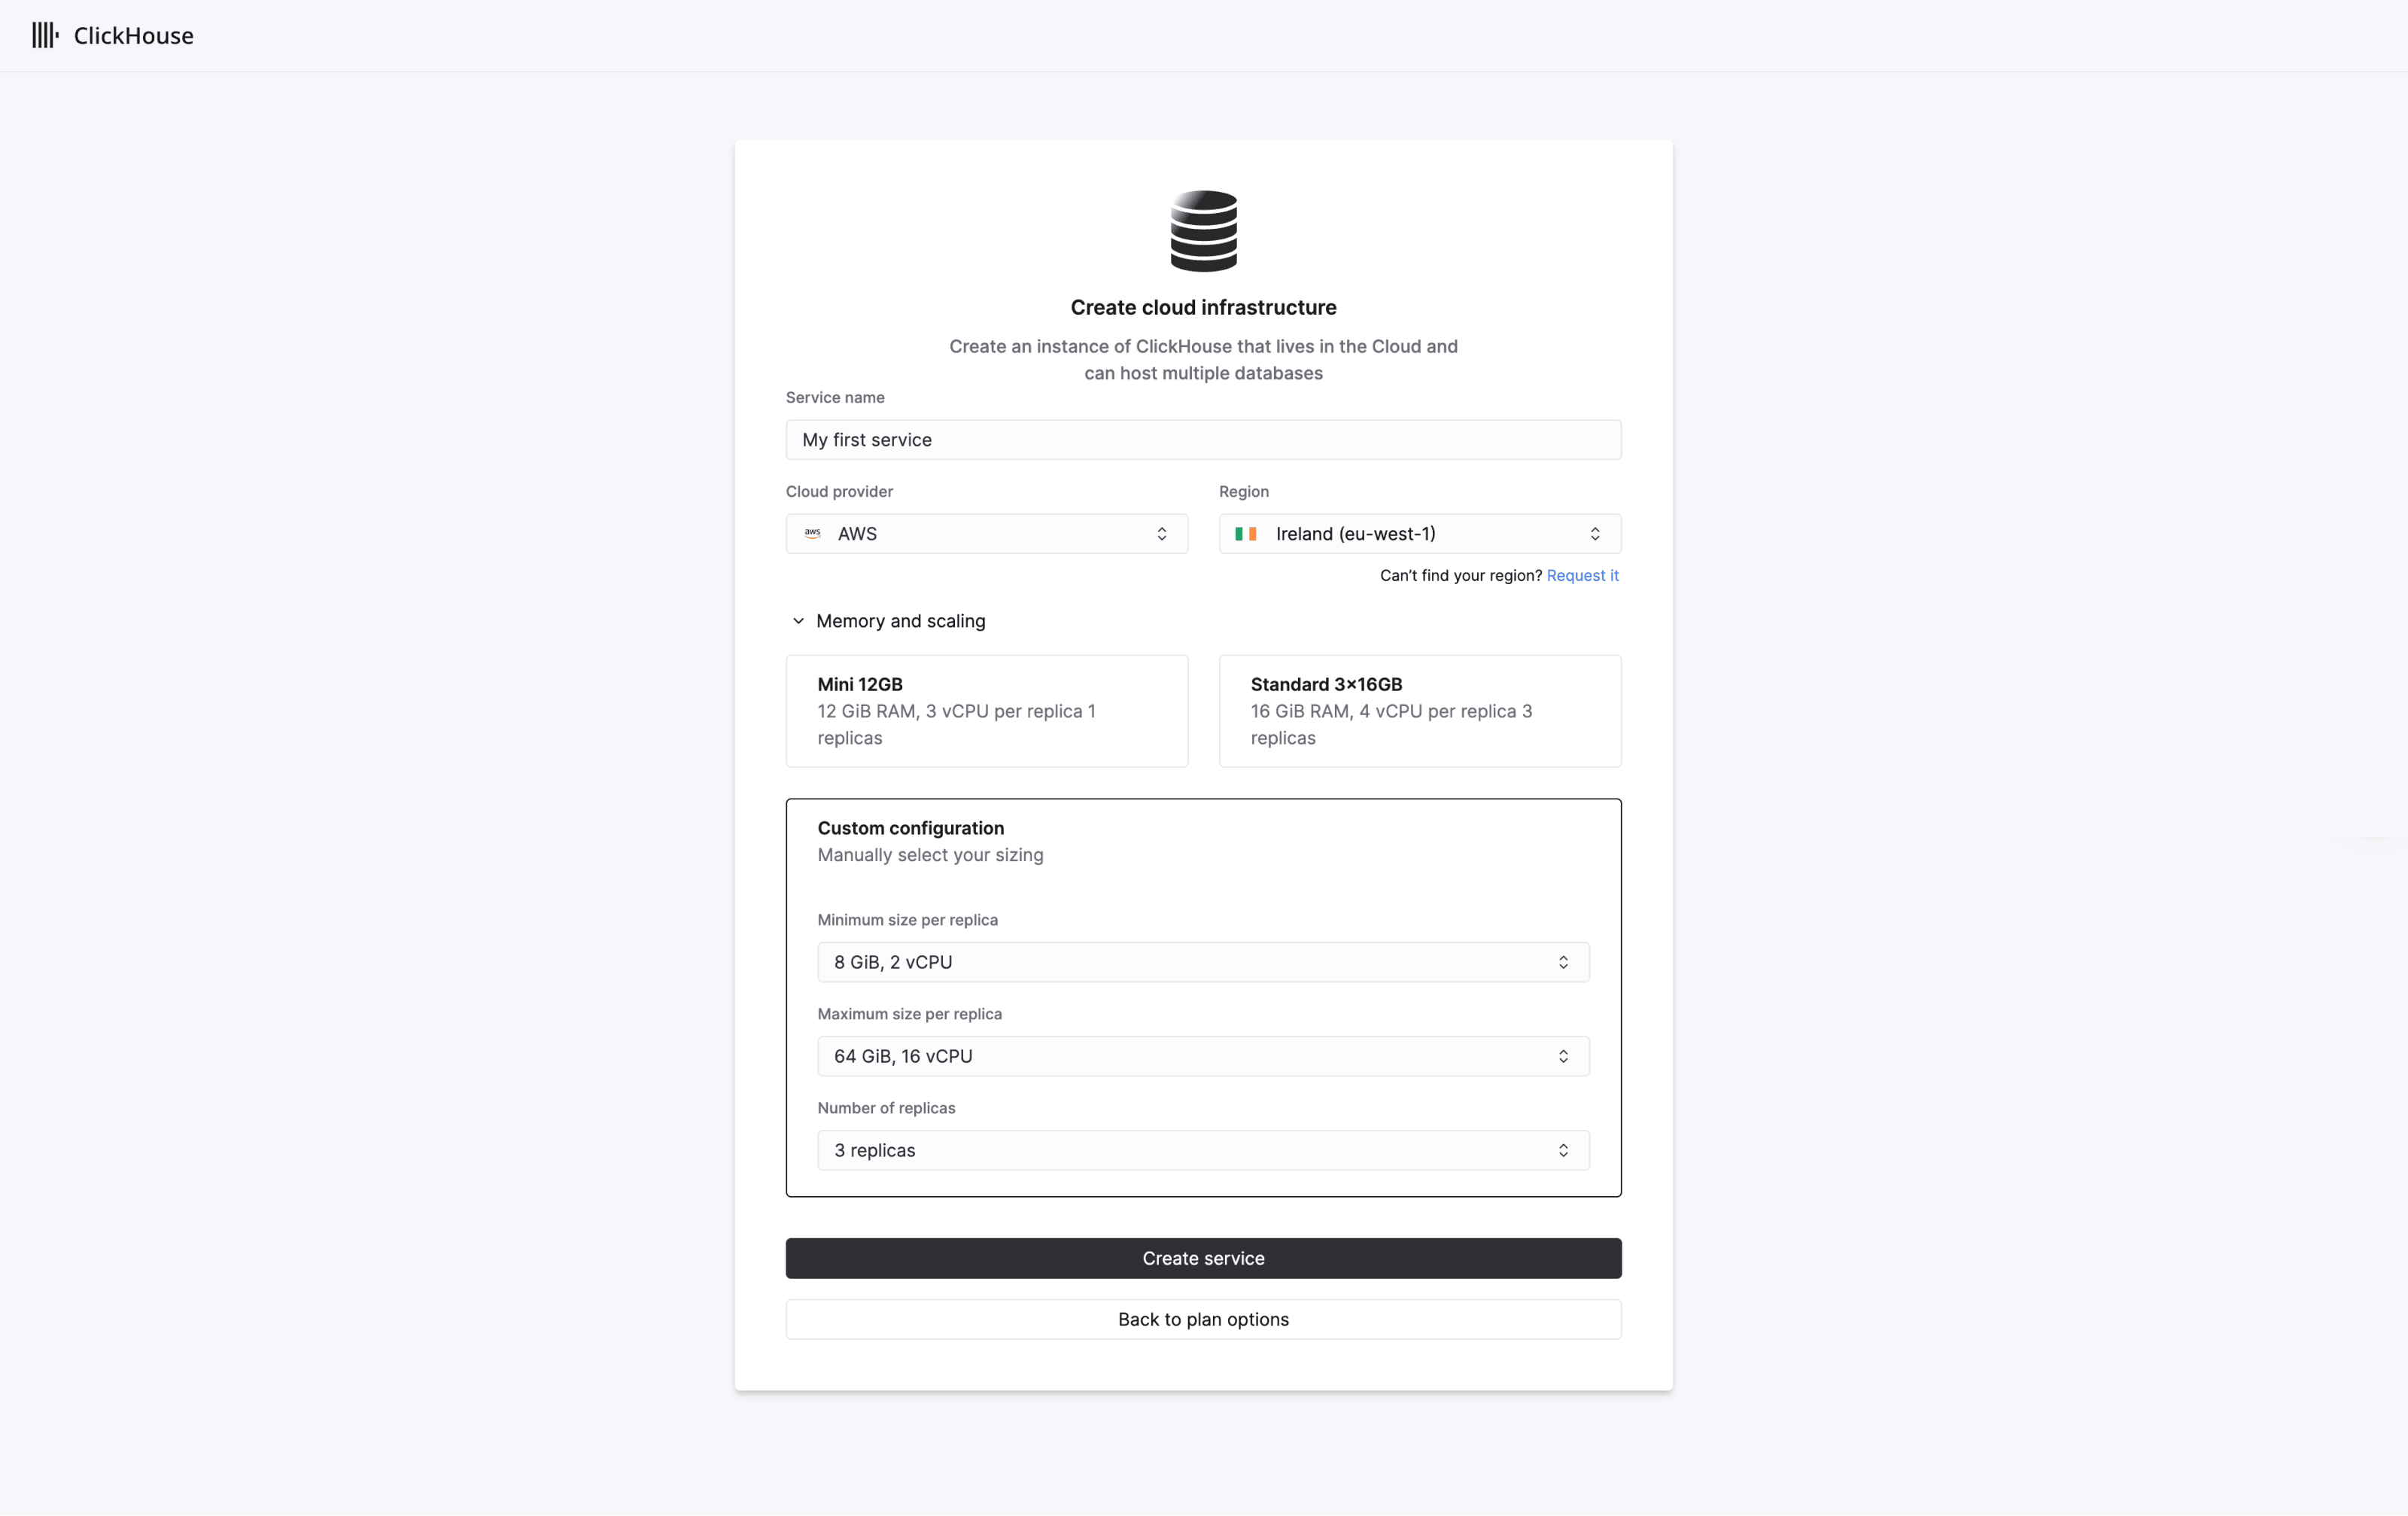
By default, new organizations are put on the Scale tier and will create 3 replicas each with 4 VCPUs and 16 GiB RAM. Vertical autoscaling will be enabled by default in the Scale tier. You can change your organization tier later on the ‘Plans’ page.
Customize the service resources if needed by specifying a minimum and maximum size for replicas to scale between. When ready, select Create service.
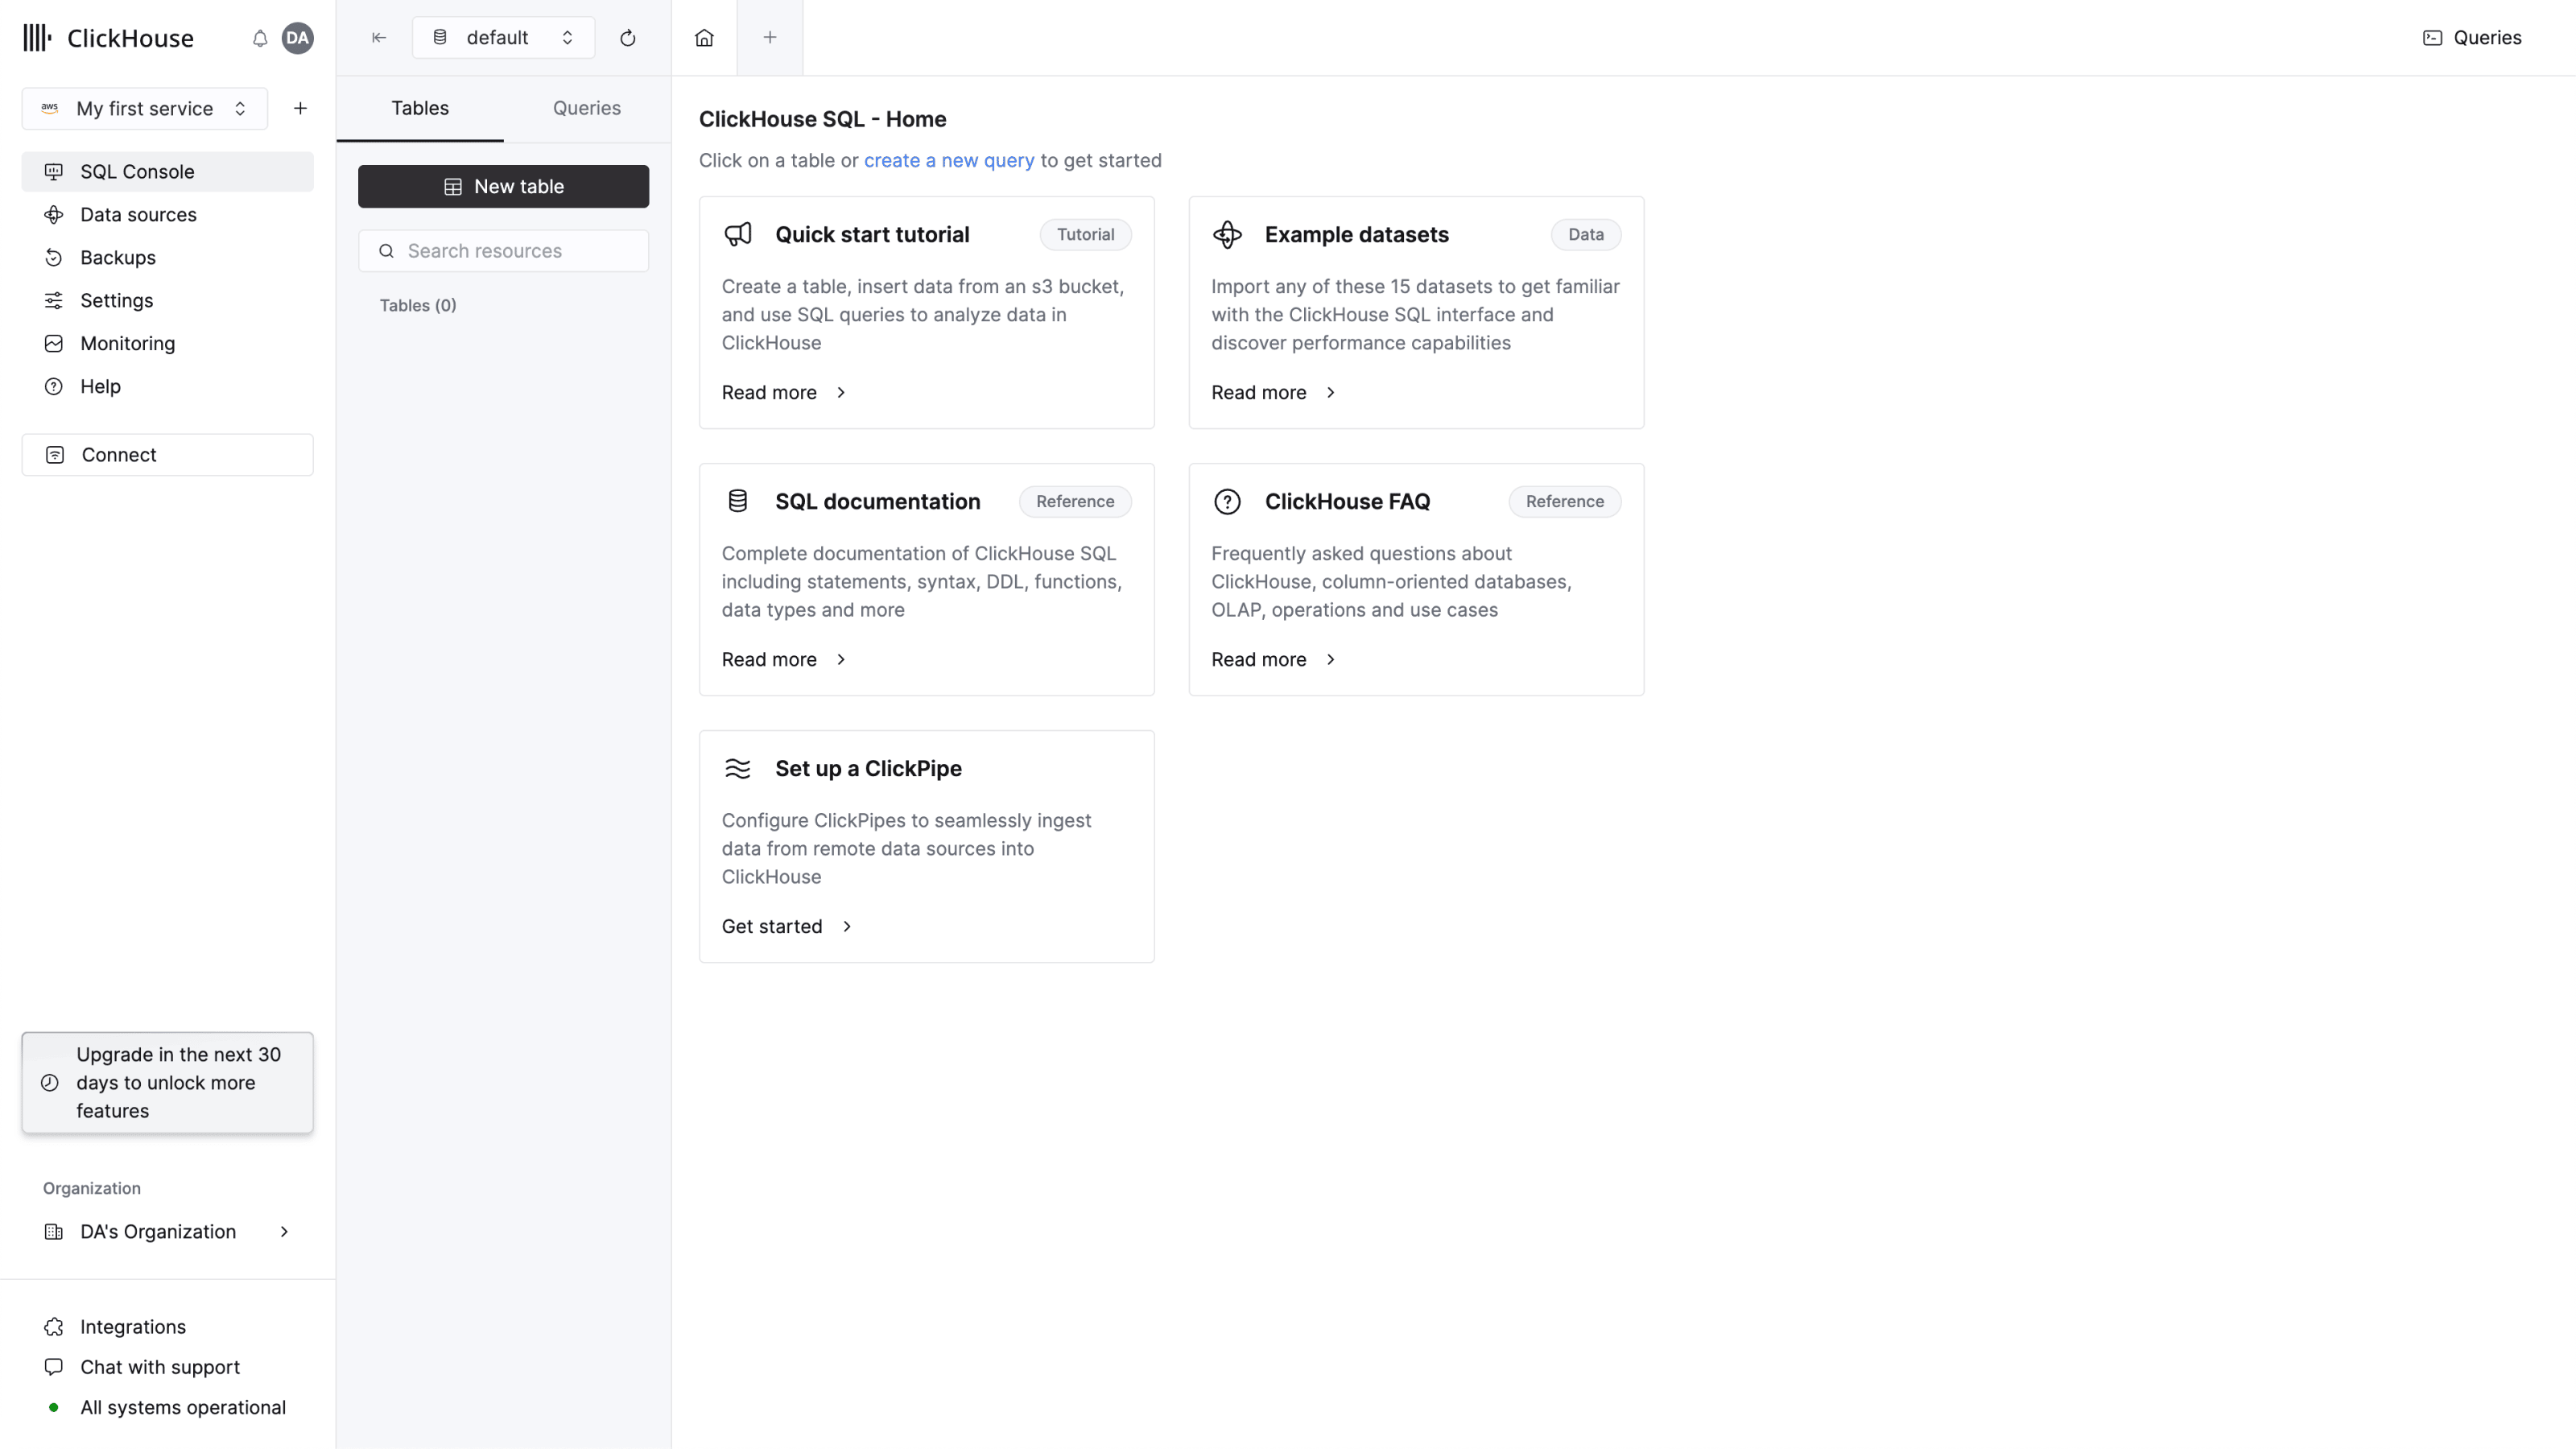
Congratulations! Your ClickHouse Cloud service is up and running and onboarding is complete. Keep reading for details on how to start ingesting and querying your data.
Connect to ClickHouse
There are 2 ways to connect to ClickHouse:
- Connect using our web-based SQL console
- Connect with your app
Connect using SQL console
For getting started quickly, ClickHouse provides a web-based SQL console to which you will be redirected on completing onboarding.
Create a query tab and enter a simple query to verify that your connection is working:
SHOW databasesYou should see 4 databases in the list, plus any that you may have added.
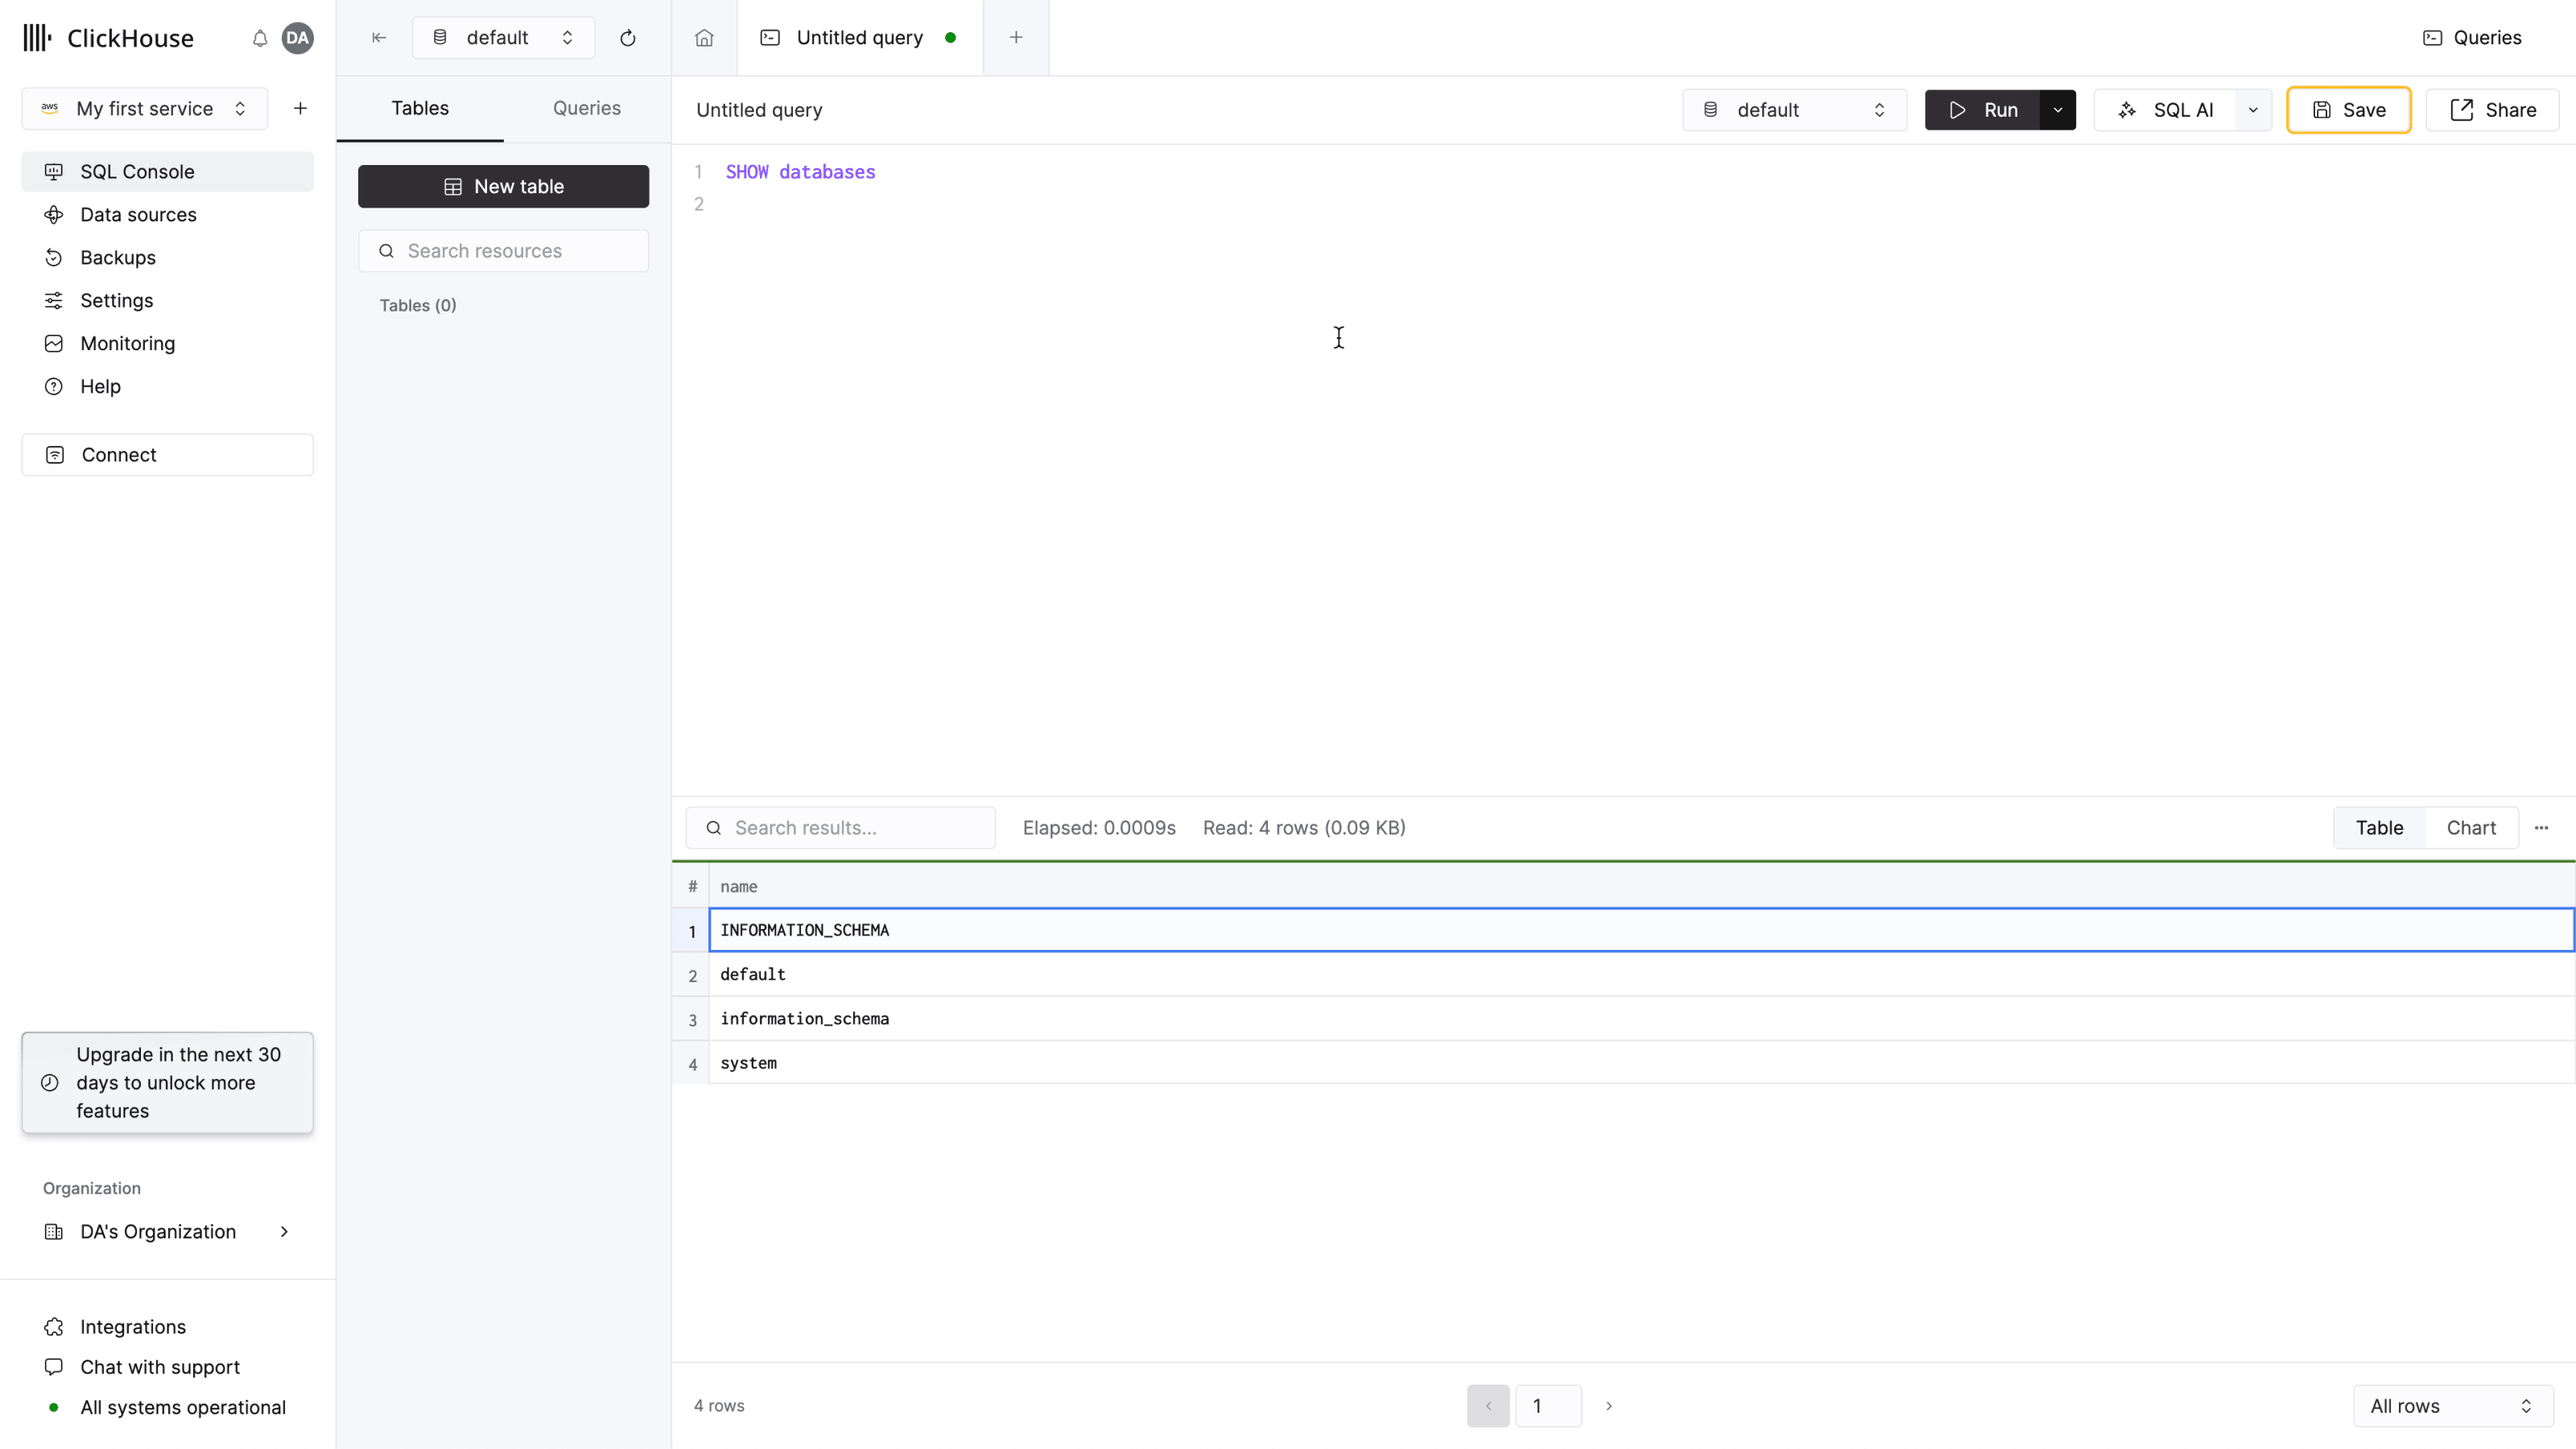
That’s it - you’re ready to start using your new ClickHouse service!
Connect with your app
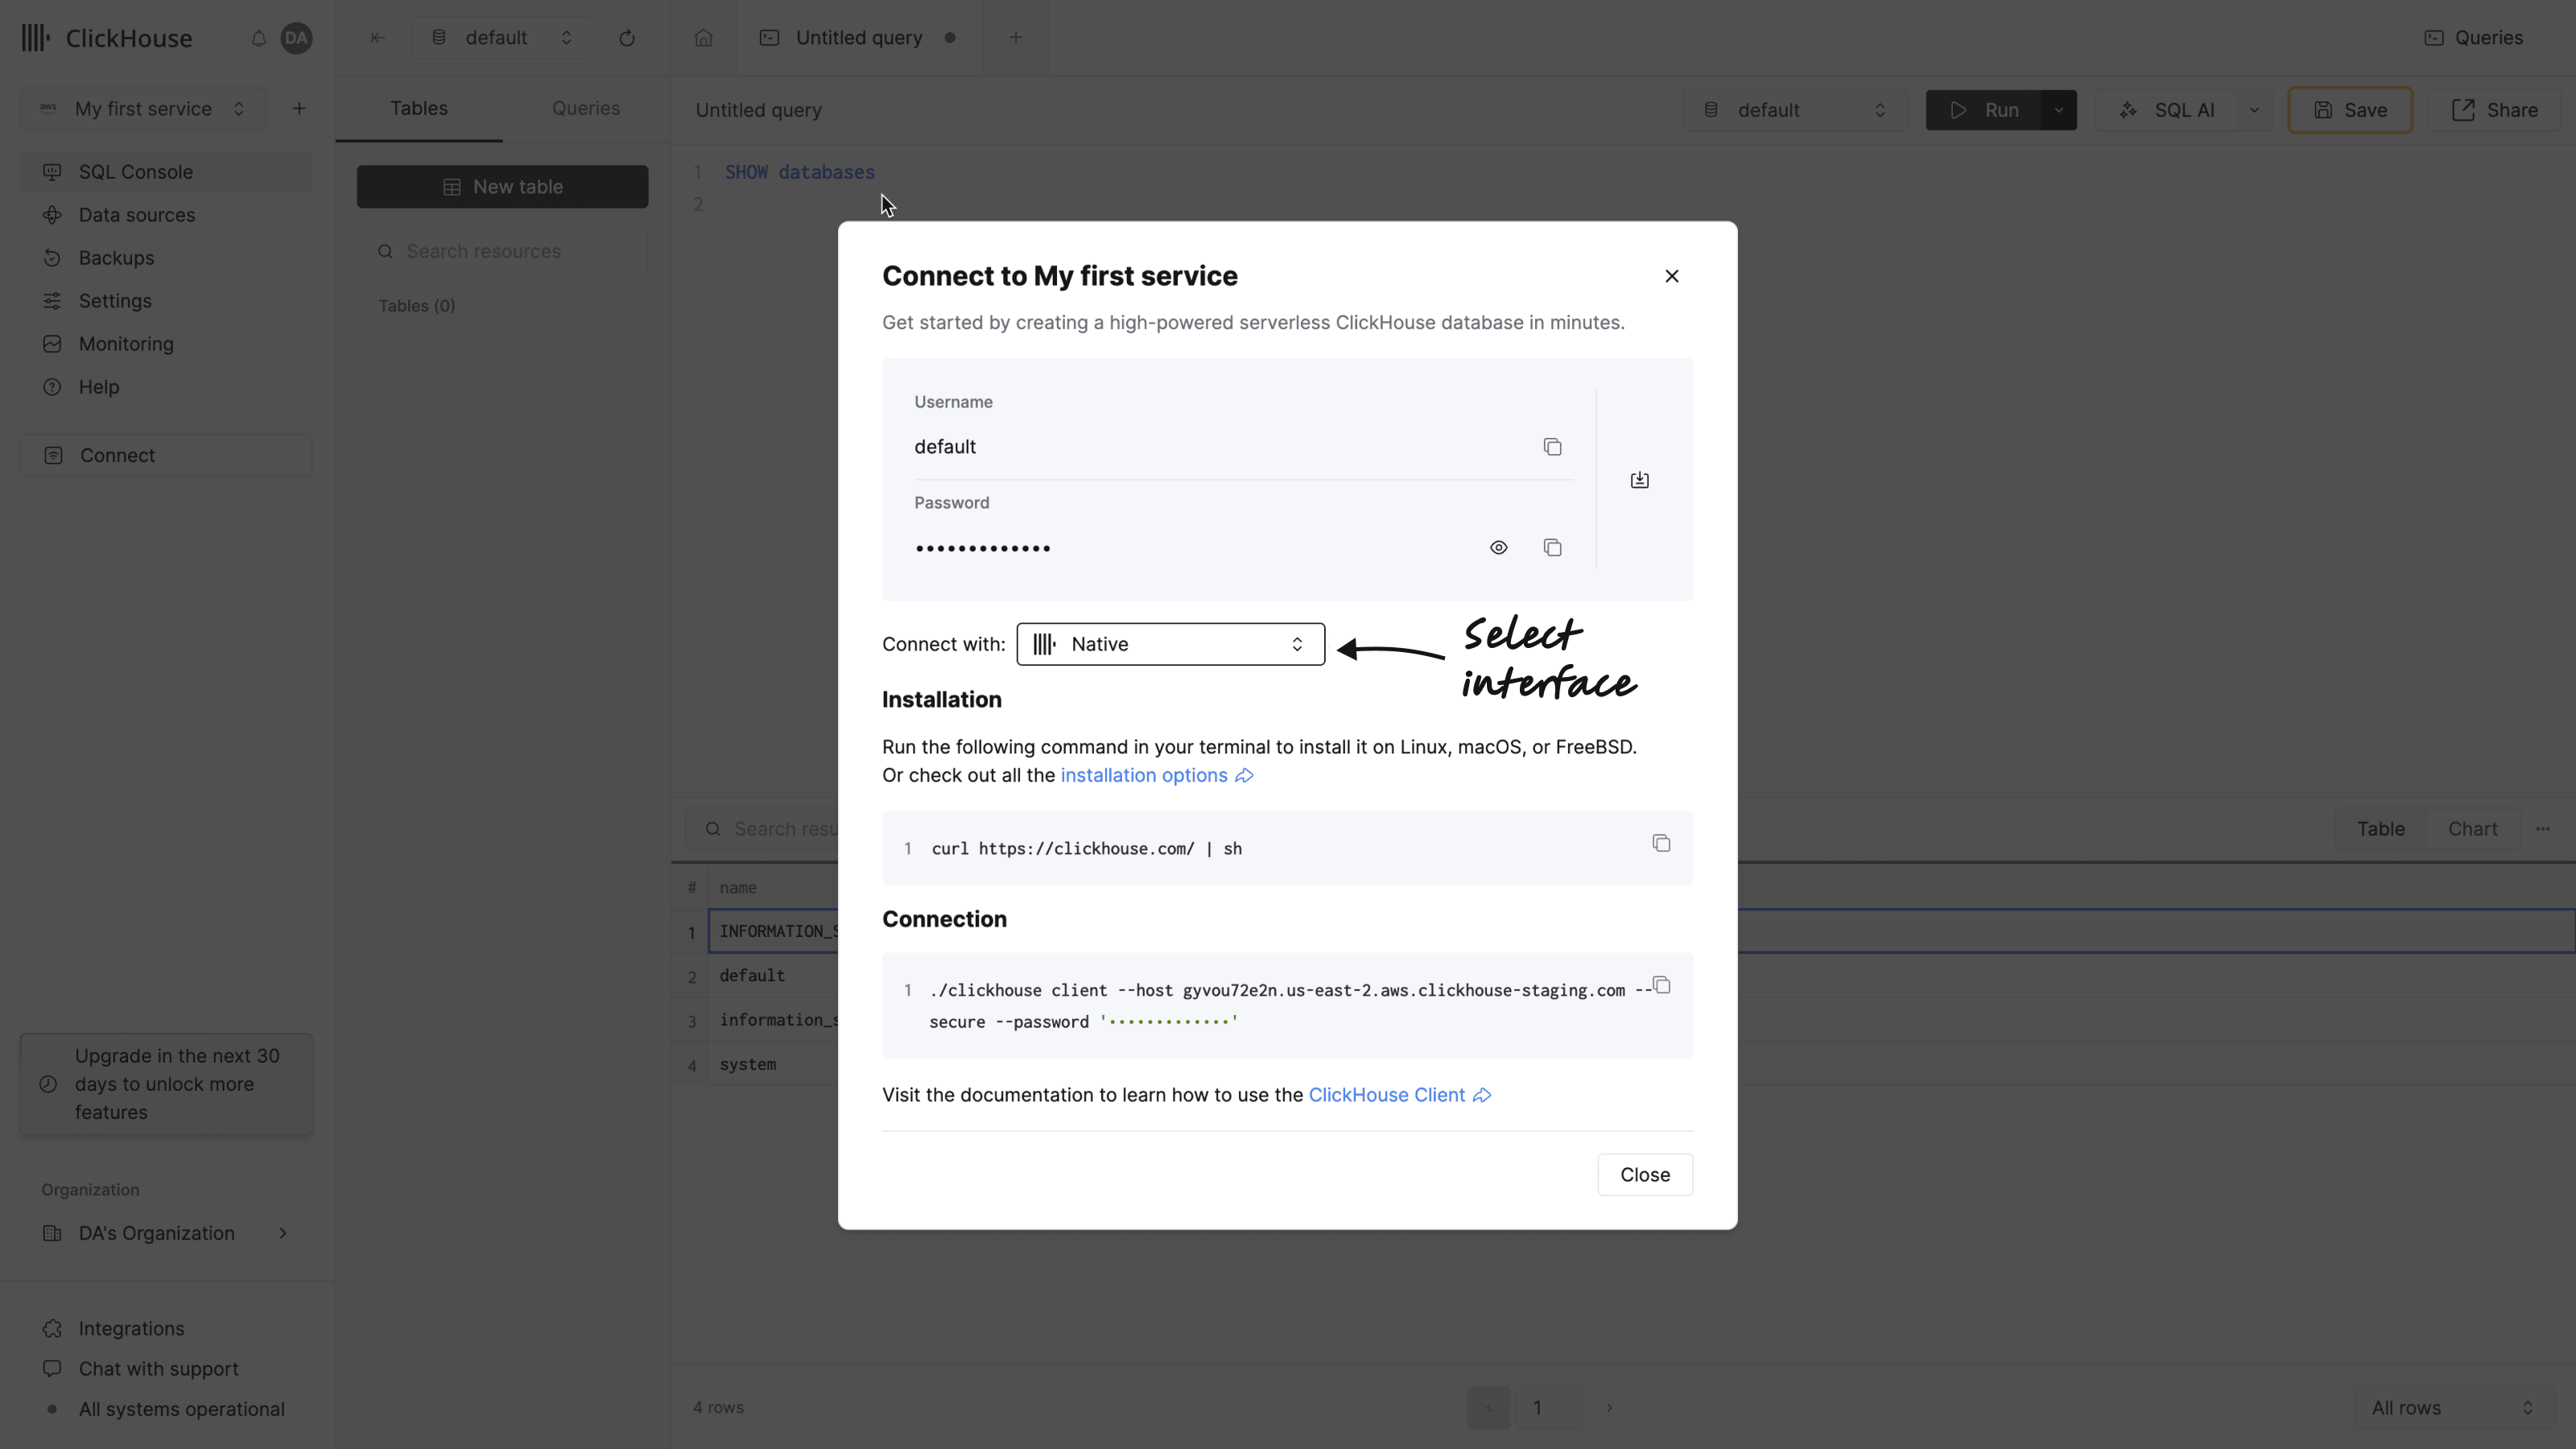
Press the connect button from the navigation menu. A modal will open offering the credentials to your service and offering you a set of instructions on how to connect with your interface or language clients.
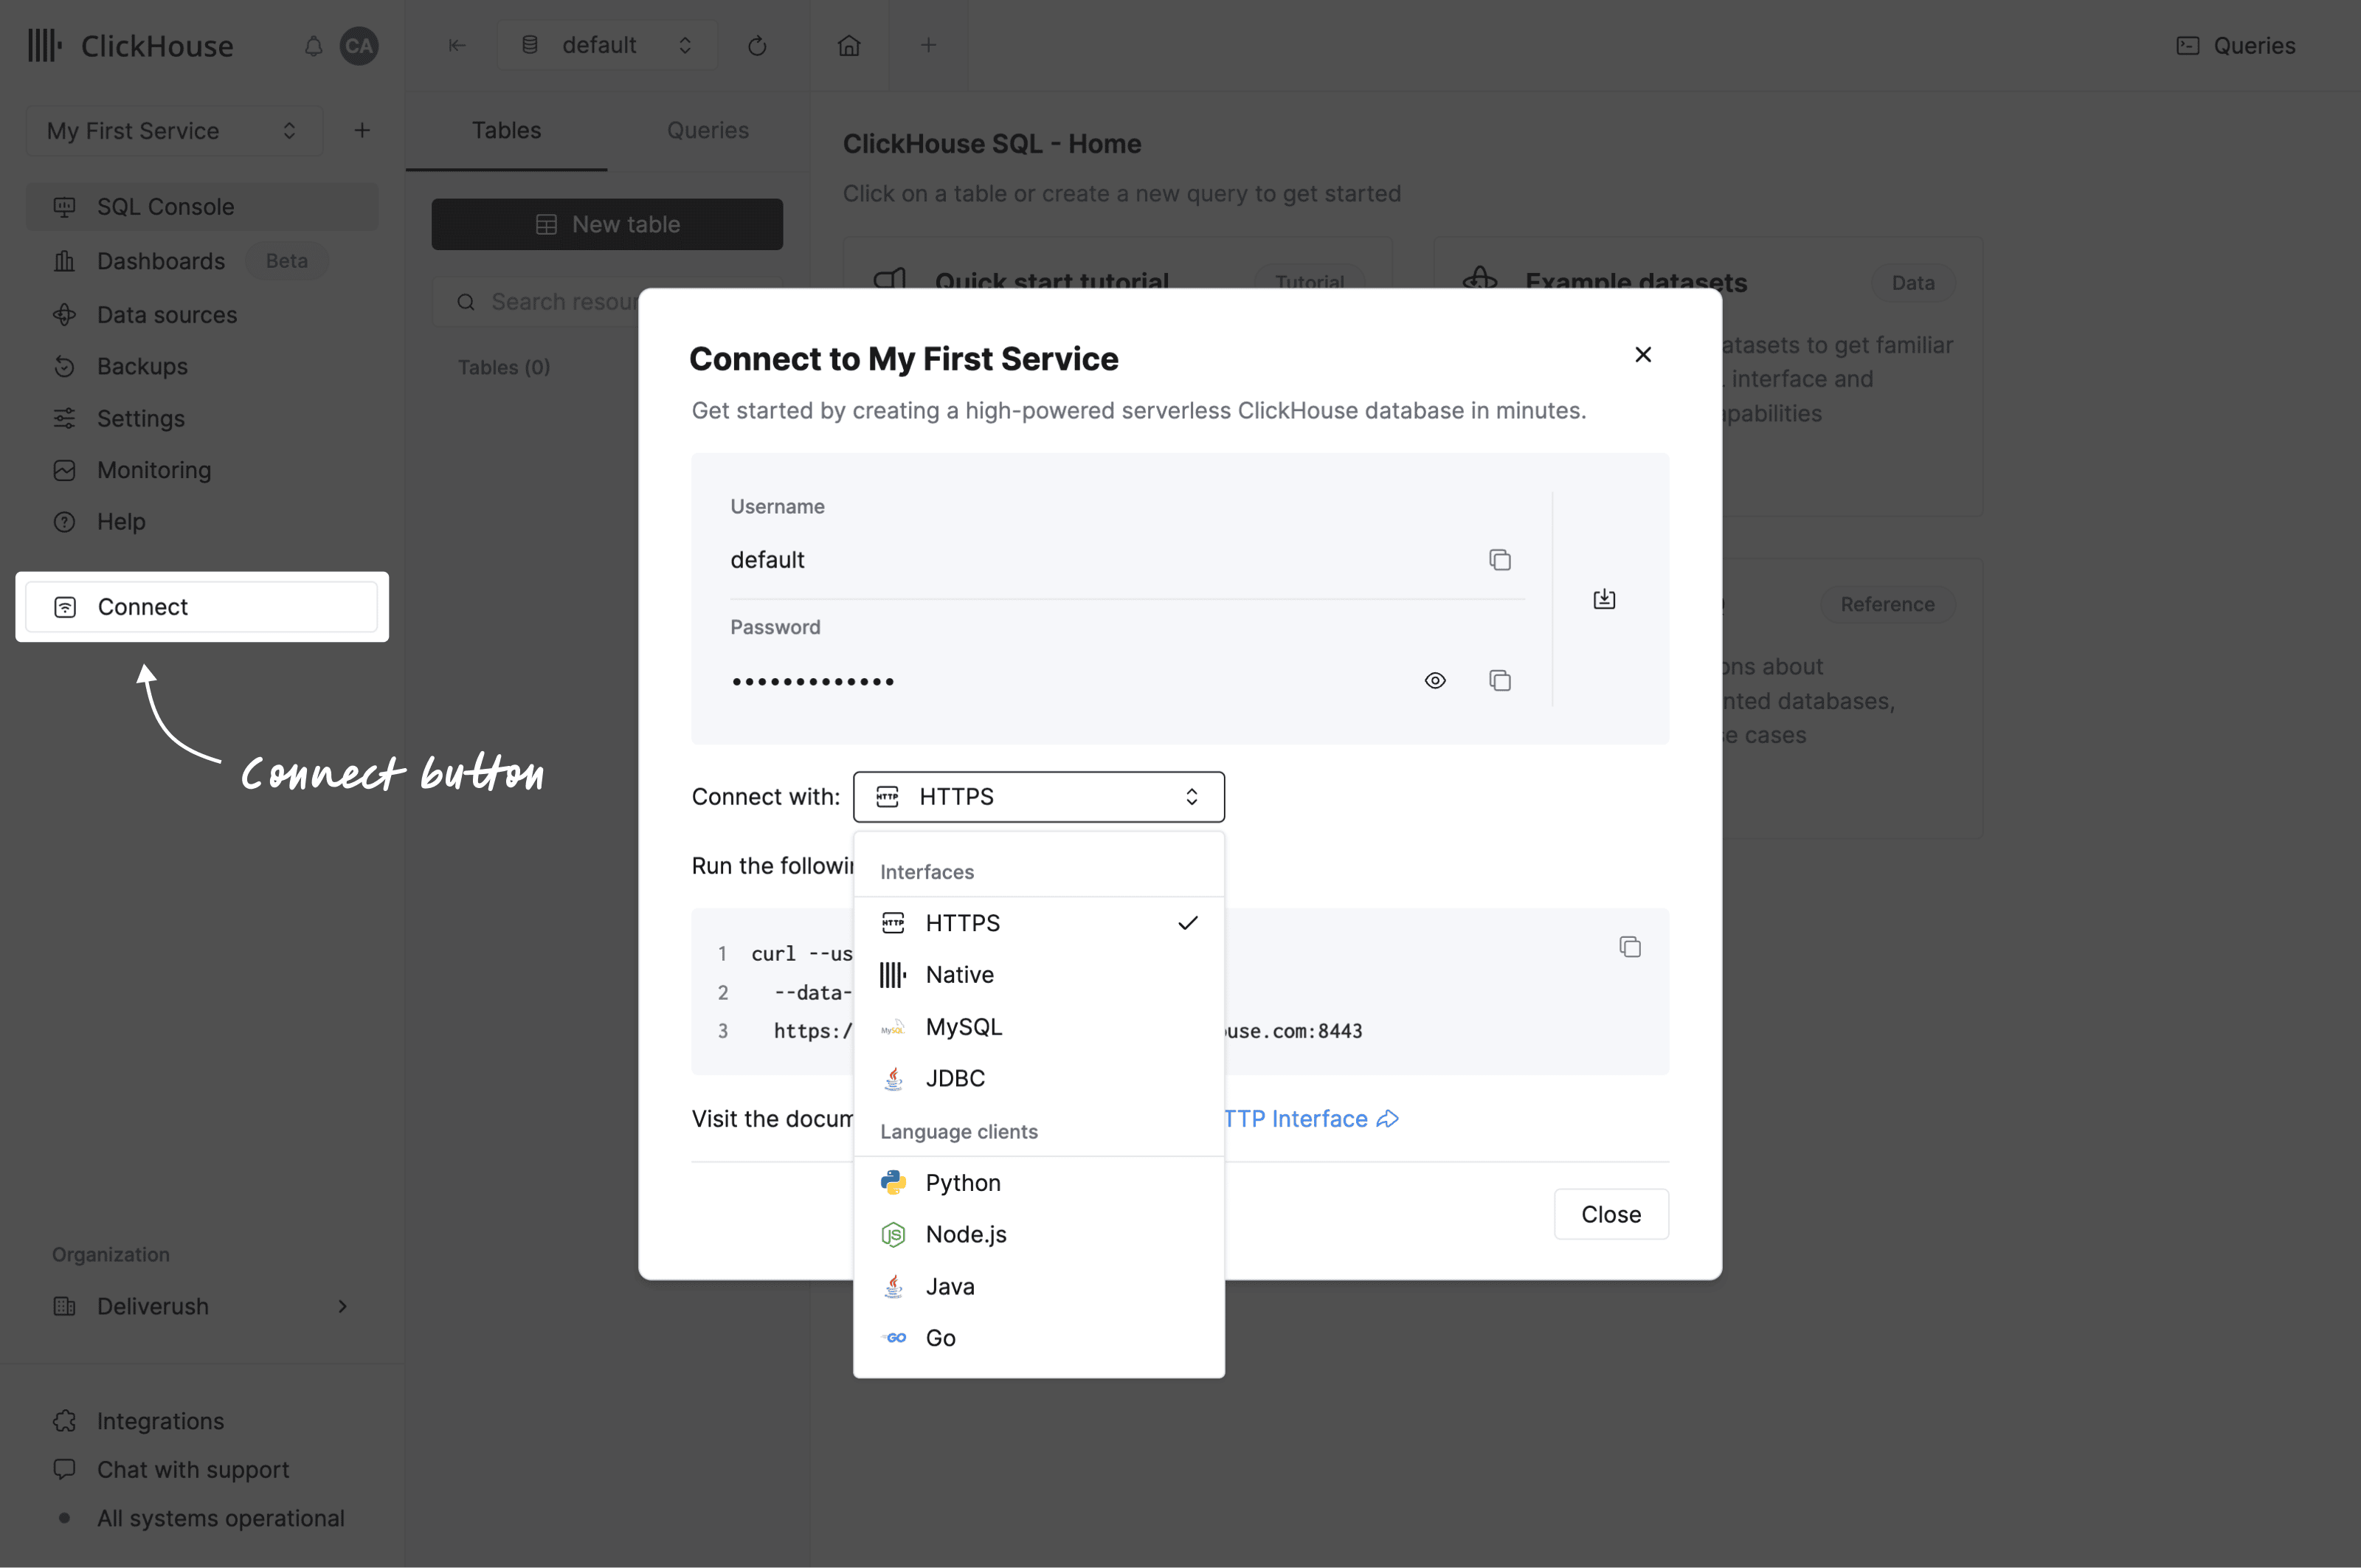
If you can’t see your language client, you may want to check our list of Integrations.
Add data
ClickHouse is better with data! There are multiple ways to add data and most of them are available on the Data Sources page, which can be accessed in the navigation menu.
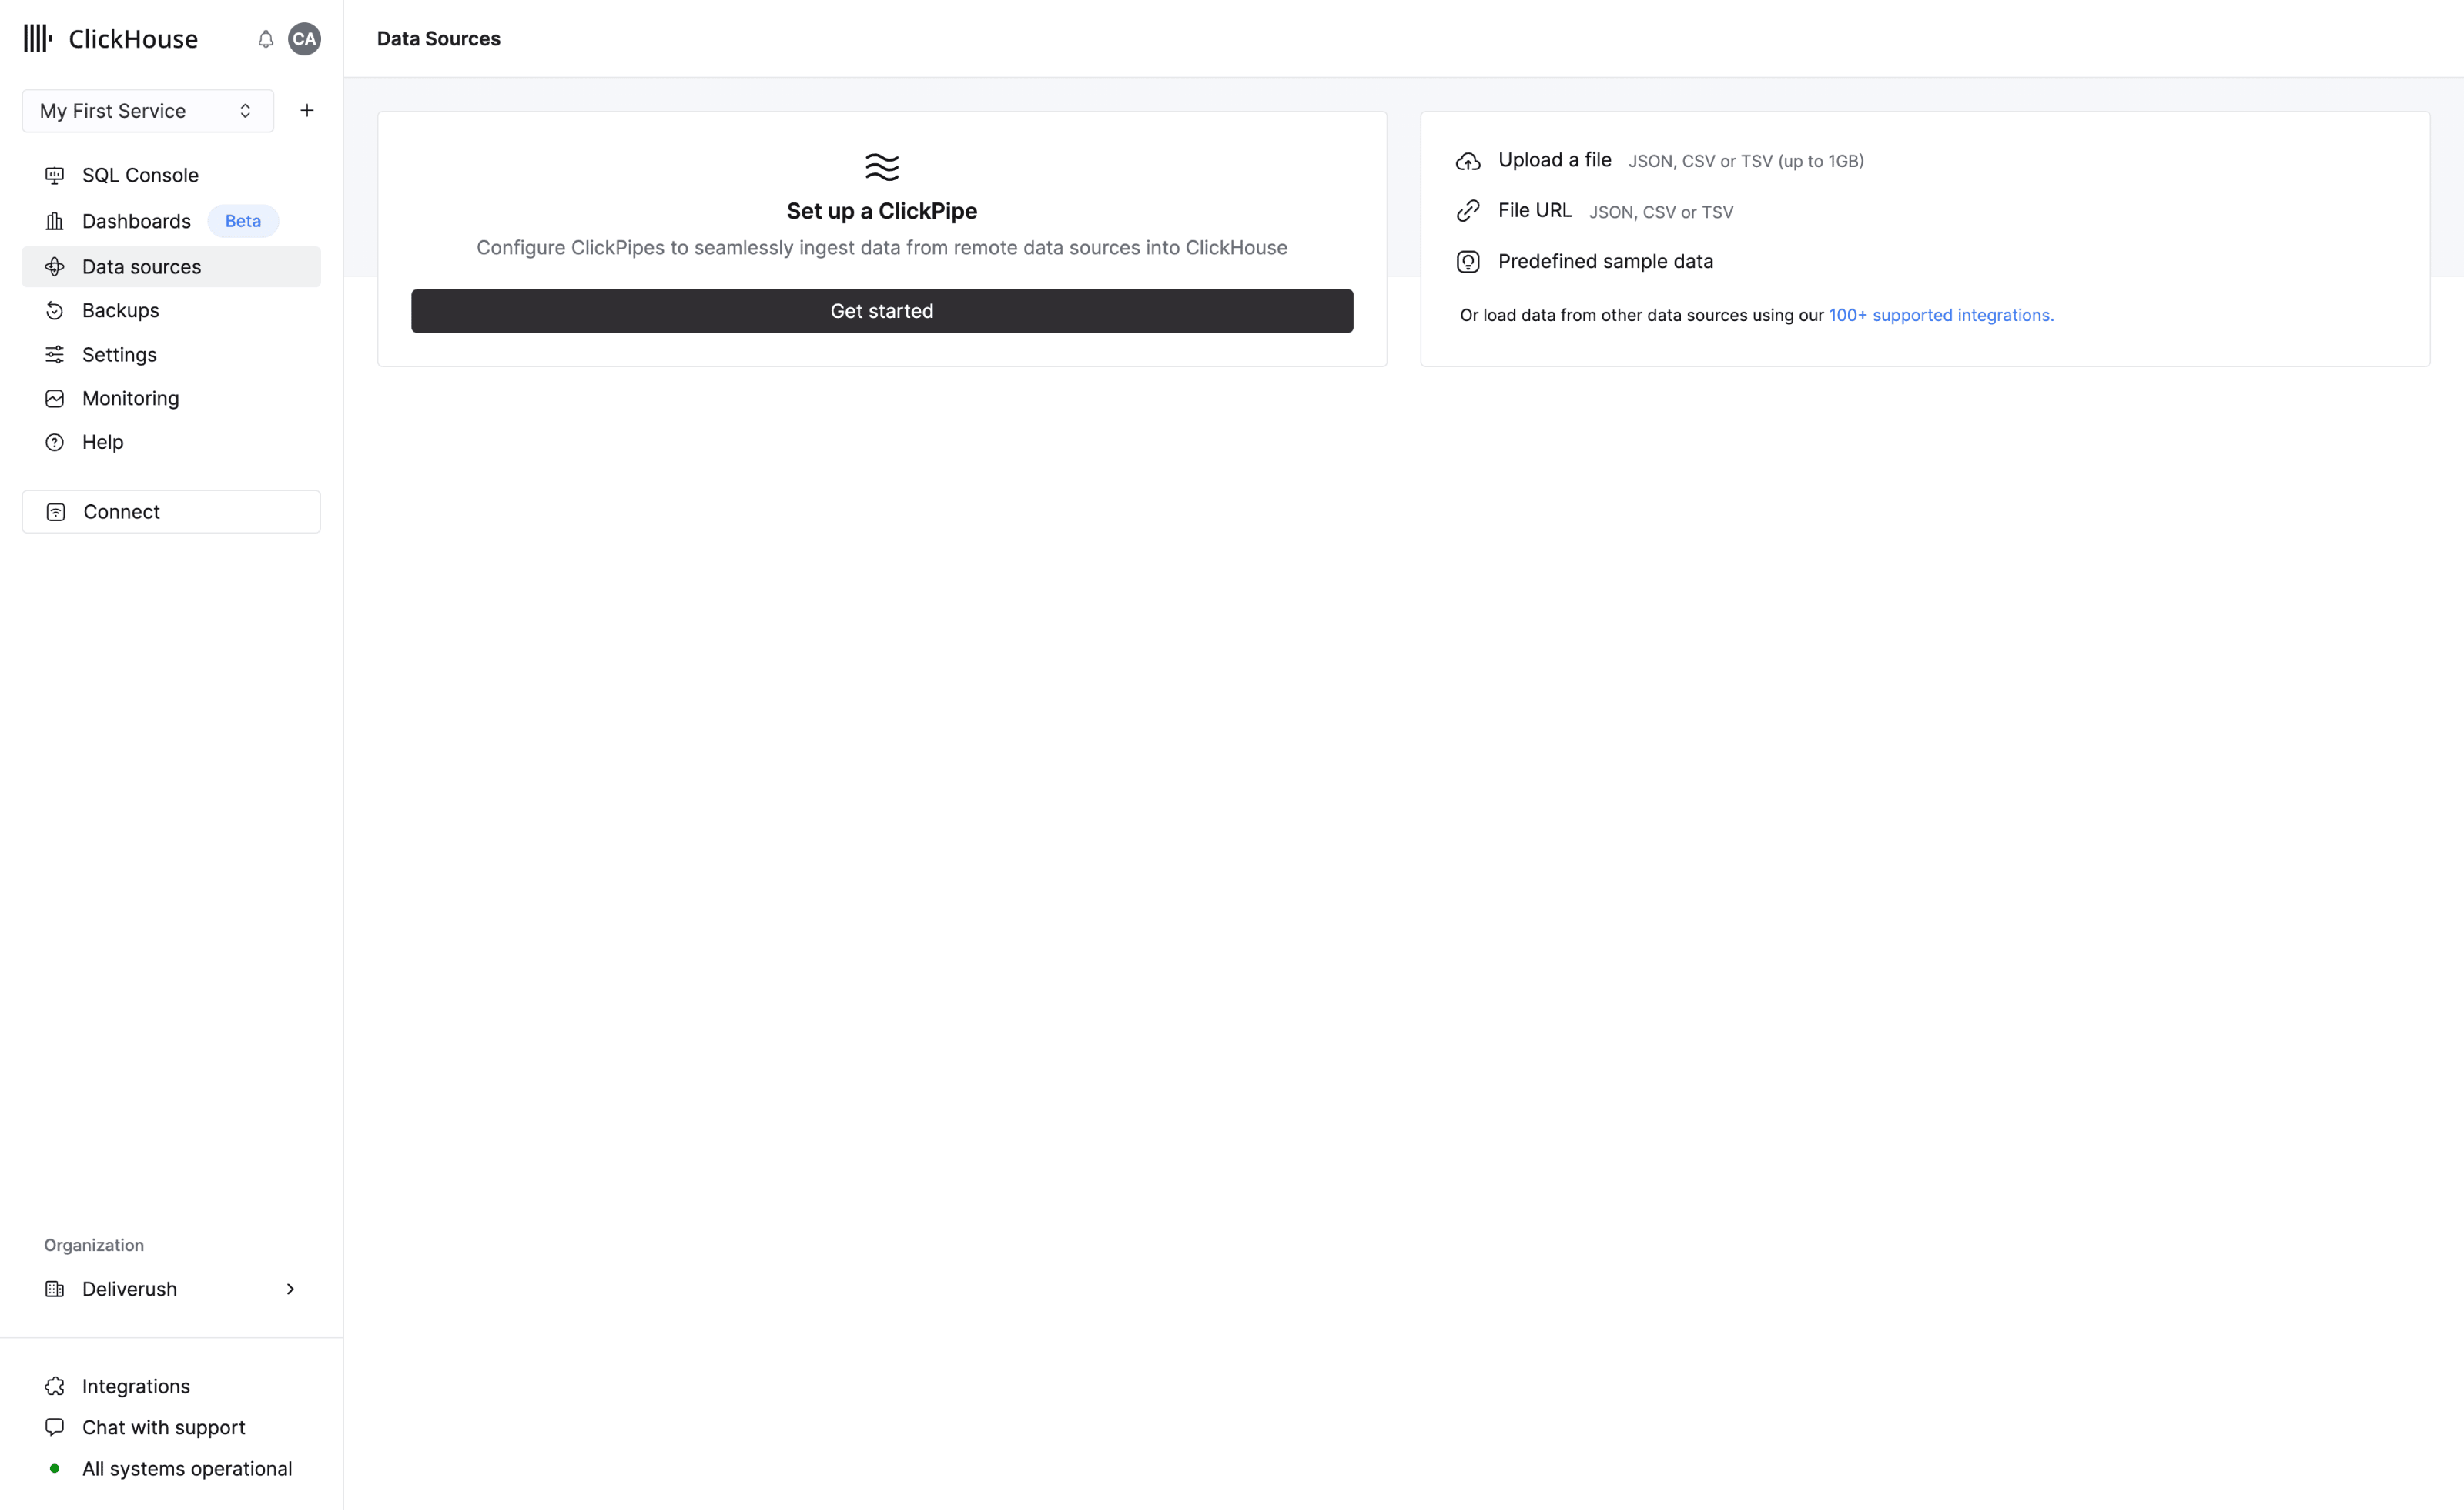
You can upload data using the following methods:
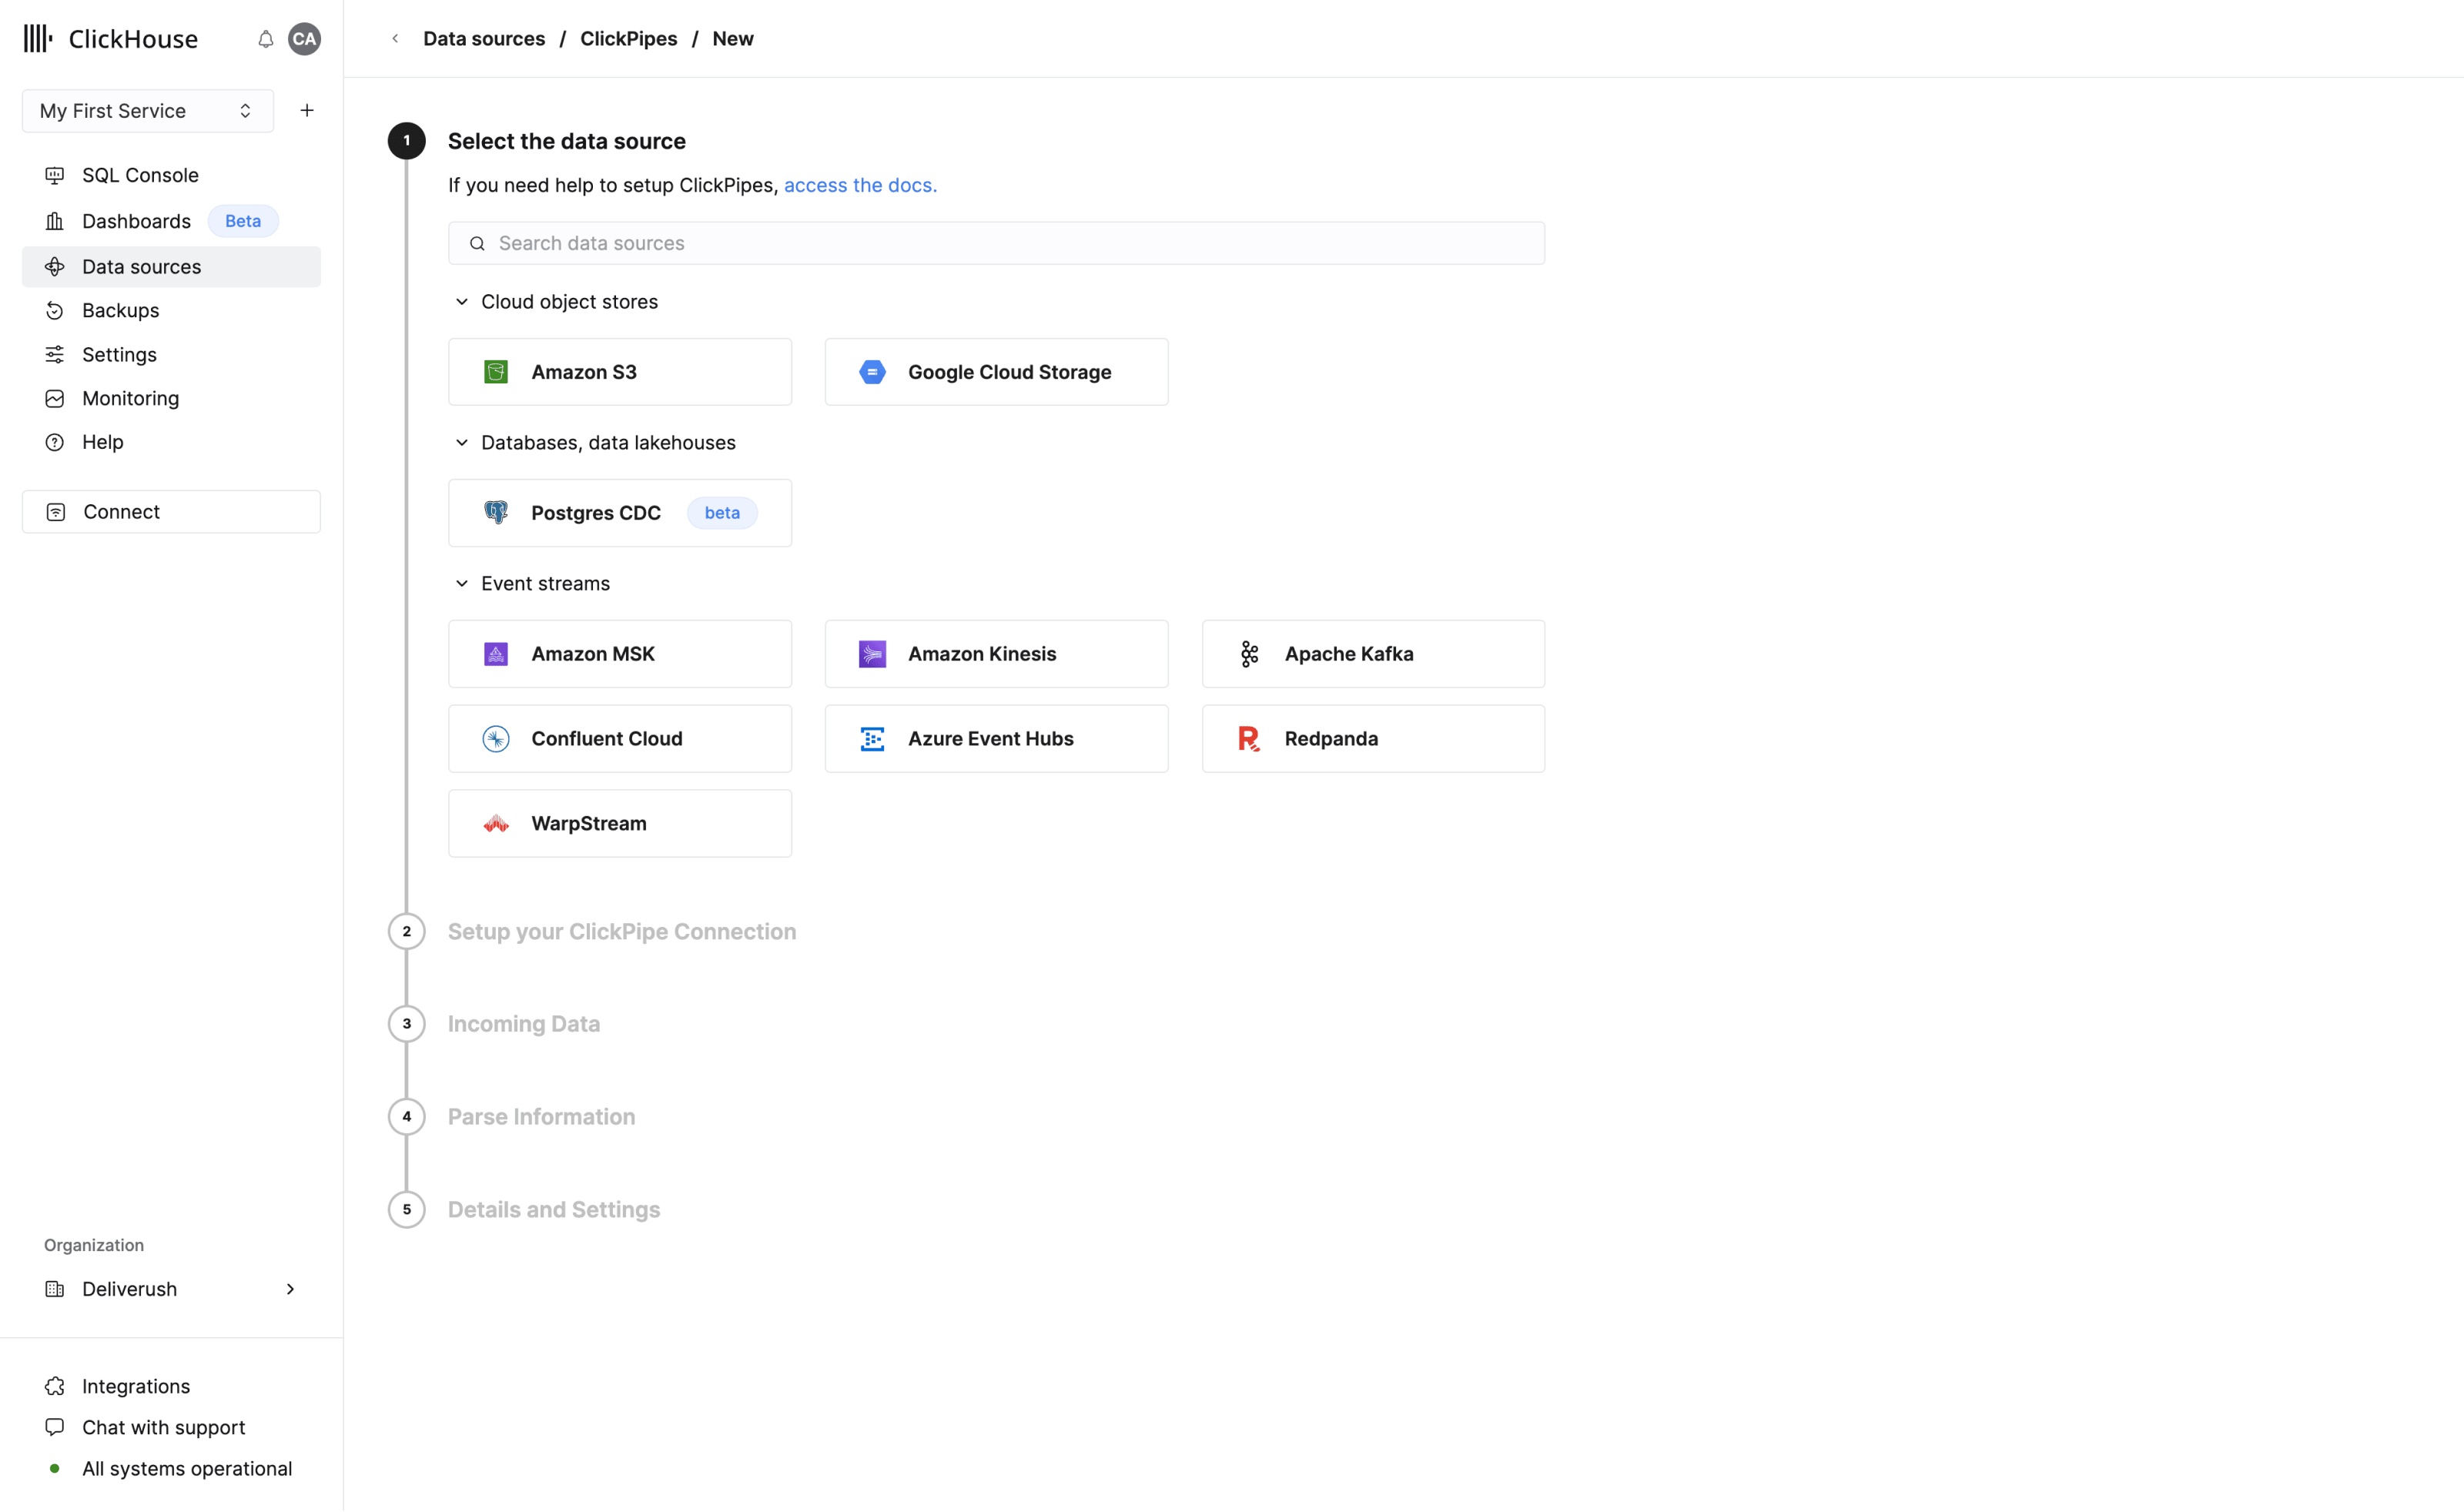
- Setup a ClickPipe to start ingesting data from data sources like S3, Postgres, Kafka, GCS
- Use the SQL console
- Use the ClickHouse client
- Upload a file - accepted formats include JSON, CSV and TSV
- Upload data from file URL
ClickPipes
ClickPipes is a managed integration platform that makes ingesting data from a diverse set of sources as simple as clicking a few buttons. Designed for the most demanding workloads, ClickPipes’s robust and scalable architecture ensures consistent performance and reliability. ClickPipes can be used for long-term streaming needs or one-time data loading job.
Add data using the SQL Console
Like most database management systems, ClickHouse logically groups tables into databases. Use the CREATE DATABASE command to create a new database in ClickHouse:
CREATE DATABASE IF NOT EXISTS helloworldRun the following command to create a table named my_first_table in the helloworld database:
CREATE TABLE helloworld.my_first_table
(
    user_id UInt32,
    message String,
    timestamp DateTime,
    metric Float32
)
ENGINE = MergeTree()
PRIMARY KEY (user_id, timestamp)
In the example above, my_first_table is a MergeTree table with four columns:
user_id: a 32-bit unsigned integer (UInt32)message: a String data type, which replaces types likeVARCHAR,BLOB,CLOBand others from other database systemstimestamp: a DateTime value, which represents an instant in timemetric: a 32-bit floating point number (Float32)
A Brief Intro to Primary Keys
Before you go any further, it is important to understand how primary keys work in ClickHouse (the implementation of primary keys might seem unexpected!):
- primary keys in ClickHouse are not unique for each row in a table
The primary key of a ClickHouse table determines how the data is sorted when written to disk. Every 8,192 rows or 10MB of
data (referred to as the index granularity) creates an entry in the primary key index file. This granularity concept
creates a sparse index that can easily fit in memory, and the granules represent a stripe of the smallest amount of
column data that gets processed during SELECT queries.
The primary key can be defined using the PRIMARY KEY parameter. If you define a table without a PRIMARY KEY specified,
then the key becomes the tuple specified in the ORDER BY clause. If you specify both a PRIMARY KEY and an ORDER BY, the primary key must be a subset of the sort order.
The primary key is also the sorting key, which is a tuple of (user_id, timestamp). Therefore, the data stored in each
column file will be sorted by user_id, then timestamp.
For a deep dive into core ClickHouse concepts, see “Core Concepts”.
Insert data into your table
You can use the familiar INSERT INTO TABLE command with ClickHouse, but it is important to understand that each insert into a MergeTree table causes a part to be created in storage.
Even for a simple example, let’s insert more than one row at a time:
INSERT INTO helloworld.my_first_table (user_id, message, timestamp, metric) VALUES
    (101, 'Hello, ClickHouse!',                                 now(),       -1.0    ),
    (102, 'Insert a lot of rows per batch',                     yesterday(), 1.41421 ),
    (102, 'Sort your data based on your commonly-used queries', today(),     2.718   ),
(101, 'Granules are the smallest chunks of data read', now() + 5, 3.14159 )Let’s verify it worked:
SELECT * FROM helloworld.my_first_tableAdd data using the ClickHouse Client
You can also connect to your ClickHouse Cloud service using a command-line tool named clickhouse client. Click Connect on the left menu to access these details. From the dialog select Native from the drop-down:
-
Install ClickHouse.
-
Run the command, substituting your hostname, username, and password:
./clickhouse client --host HOSTNAME.REGION.CSP.clickhouse.cloud \
--secure --port 9440 \
--user default \
--password <password>
If you get the smiley face prompt, you’re ready to run queries!
:)- Give it a try by running the following query:
SELECT *
FROM helloworld.my_first_table
ORDER BY timestamp
Notice the response comes back in a nice table format:
┌─user_id─┬─message────────────────────────────────────────────┬───────────timestamp─┬──metric─┐
│     102 │ Insert a lot of rows per batch                     │ 2022-03-21 00:00:00 │ 1.41421 │
│     102 │ Sort your data based on your commonly-used queries │ 2022-03-22 00:00:00 │   2.718 │
│     101 │ Hello, ClickHouse!                                 │ 2022-03-22 14:04:09 │      -1 │
│     101 │ Granules are the smallest chunks of data read      │ 2022-03-22 14:04:14 │ 3.14159 │
└─────────┴────────────────────────────────────────────────────┴─────────────────────┴─────────┘

4 rows in set. Elapsed: 0.008 sec.- Add a
FORMATclause to specify one of the many supported output formats of ClickHouse:
SELECT *
FROM helloworld.my_first_table
ORDER BY timestamp
FORMAT TabSeparated
In the above query, the output is returned as tab-separated:
Query id: 3604df1c-acfd-4117-9c56-f86c69721121

102 Insert a lot of rows per batch      2022-03-21 00:00:00     1.41421
102 Sort your data based on your commonly-used queries  2022-03-22 00:00:00     2.718
101 Hello, ClickHouse!  2022-03-22 14:04:09     -1
101 Granules are the smallest chunks of data read       2022-03-22 14:04:14     3.14159

4 rows in set. Elapsed: 0.005 sec.- To exit the
clickhouse client, enter the exit command:
exitUpload a File
A common task when getting started with a database is to insert some data that you already have in files. We have some sample data online that you can insert that represents clickstream data - it includes a user ID, a URL that was visited, and the timestamp of the event.
Suppose we have the following text in a CSV file named data.csv:
102,This is data in a file,2022-02-22 10:43:28,123.45
101,It is comma-separated,2022-02-23 00:00:00,456.78
103,Use FORMAT to specify the format,2022-02-21 10:43:30,678.90- The following command inserts the data into
my_first_table:
./clickhouse client --host HOSTNAME.REGION.CSP.clickhouse.cloud \
--secure --port 9440 \
--user default \
--password <password> \
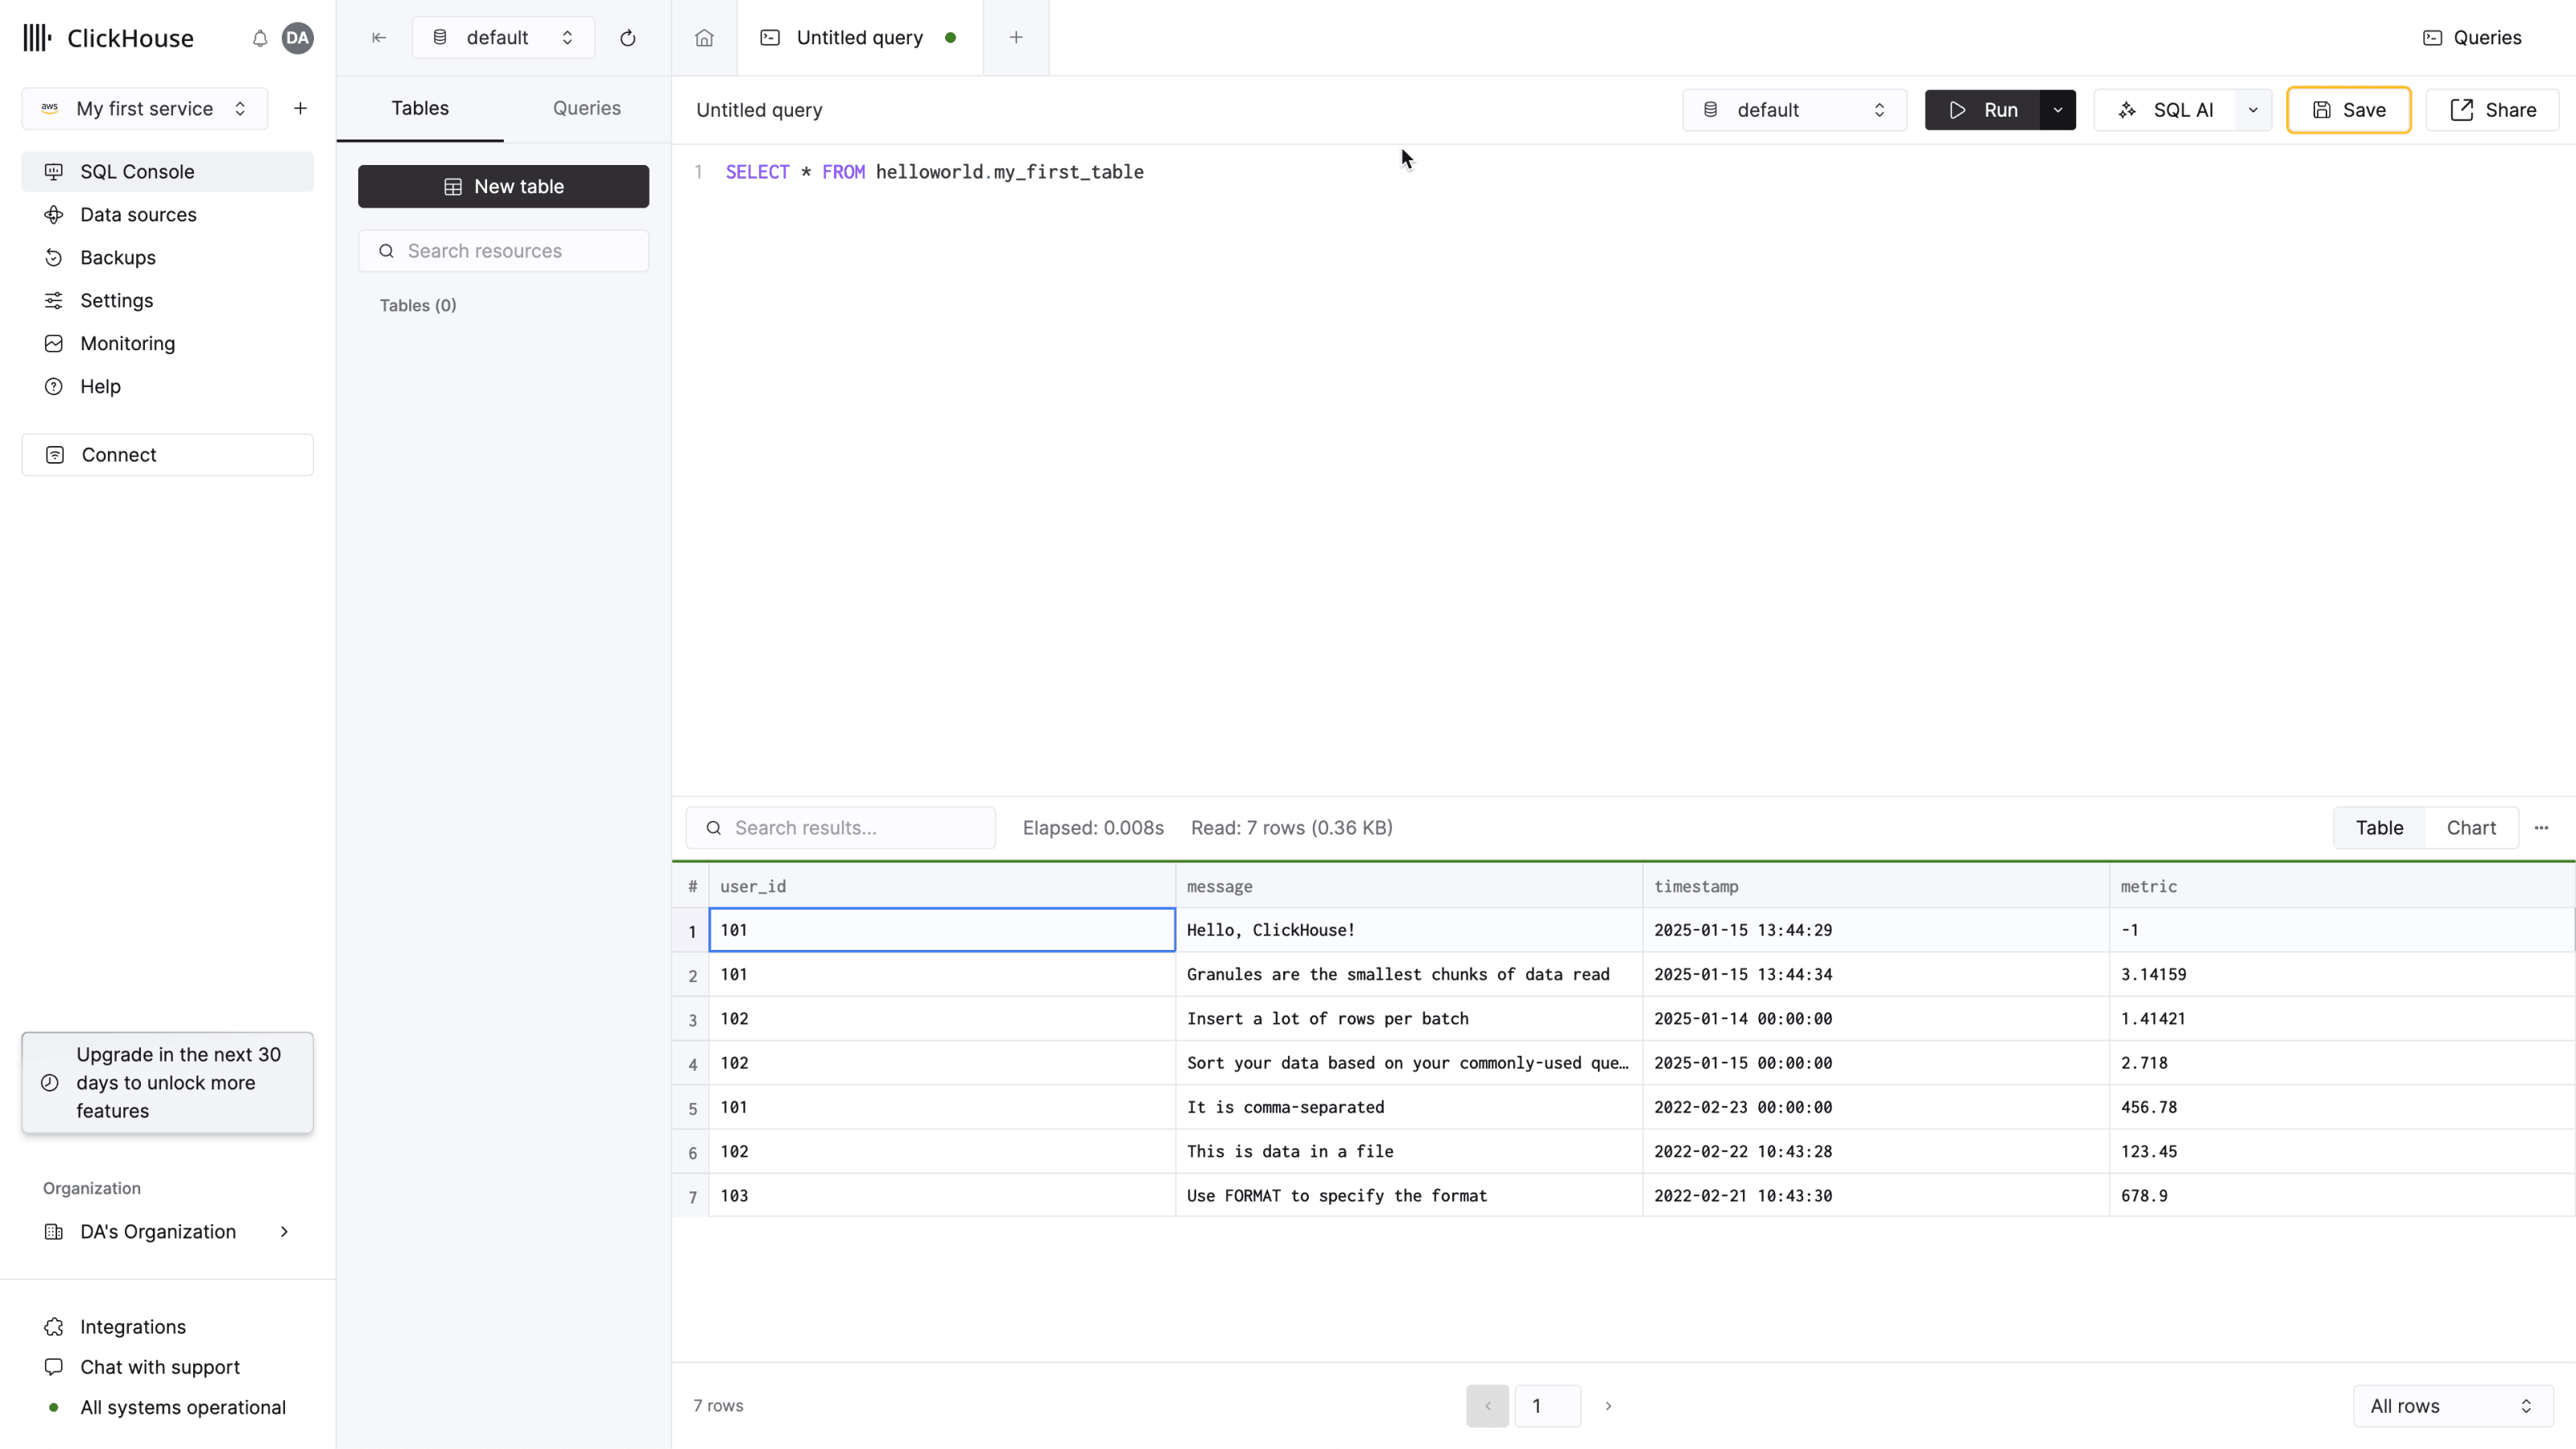
--query='INSERT INTO helloworld.my_first_table FORMAT CSV' < data.csv- Notice the new rows appear in the table now if querying from the SQL console:
What’s Next?
- The Tutorial has you insert 2 million rows into a table and write some analytical queries
- We have a list of example datasets with instructions on how to insert them
- Check out our 12-minute video on Getting Started with ClickHouse
- If your data is coming from an external source, view our collection of integration guides for connecting to message queues, databases, pipelines and more
- If you’re using a UI/BI visualization tool, view the user guides for connecting a UI to ClickHouse
- The user guide on primary keys is everything you need to know about primary keys and how to define them
You can follow this path yourself, script it, or hand it to an AI agent. Switch to the Cloud UI view for the console version.
This page covers provisioning a ClickHouse Cloud service, connecting to it, and loading data, all from the command line with the ClickHouse CLI (clickhousectl). Commands are non-interactive; clickhousectl emits JSON with --json.
Prerequisites
Install the ClickHouse CLI:
curl https://clickhouse.com/cli | shYou also need jq.
You need a ClickHouse Cloud account. If you don’t have one yet, clickhousectl cloud auth signup opens the sign-up page in your browser.
Write operations (create, delete) require API key authentication; OAuth login is read-only:
clickhousectl cloud auth login --api-key <YOUR_KEY> --api-secret <YOUR_SECRET>Alternatively, set the CLICKHOUSE_CLOUD_API_KEY and CLICKHOUSE_CLOUD_API_SECRET environment variables. Verify with clickhousectl cloud auth status; expect an entry with scope read/write.
Create a ClickHouse service
Create the service and save the response; the password for the default user is shown only once:
clickhousectl cloud service create \
  --name quickstart-ch \
  --region us-east-1 \
  --json > ch.json
The response includes the service ID, endpoints, and the generated password (trimmed here; the full response also contains scaling settings, the IP access list, and tags):
{
  "password": "dK7mPq2x_-TzrL9vNw0s",
  "service": {
    "id": "4f7b92f3-4163-403a-b538-b9bc6e2e8f66",
    "name": "quickstart-ch",
    "provider": "aws",
    "region": "us-east-1",
    "state": "provisioning",
    "endpoints": [
      {
        "host": "quickstart-abc123.us-east-1.aws.clickhouse.cloud",
        "port": 9440,
        "protocol": "nativesecure"
      },
      {
        "host": "quickstart-abc123.us-east-1.aws.clickhouse.cloud",
        "port": 8443,
        "protocol": "https"
      }
    ],
    "numReplicas": 3,
    "minReplicaMemoryGb": 16.0,
    "maxReplicaMemoryGb": 120.0
  }
}
Extract what the rest of this guide needs:
CH_ID=$(jq -r .service.id ch.json)
CH_PASSWORD=$(jq -r .password ch.json)
CH_HOST=$(jq -r '.service.endpoints[] | select(.protocol=="nativesecure") | .host' ch.json)
If the password is lost, generate a new one with clickhousectl cloud service reset-password "$CH_ID".
Services created with clickhousectl default to an IP access list that allows all (0.0.0.0/0). To restrict access, pass --ip-allow when creating the service; see “Setting IP filters”.
Wait for the service to provision
Provisioning takes about a minute. Poll until the state is running:
while [ "$(clickhousectl cloud service get "$CH_ID" --json | jq -r .state)" != "running" ]; do
  sleep 15
done
Run SQL with the Query API
clickhousectl cloud service query runs SQL over HTTP — no local clickhouse binary or service password required. The first call provisions a Query API endpoint and a service-scoped API key automatically:
clickhousectl cloud service query --id "$CH_ID" --query "SHOW databases"Provisioning Query API endpoint + key for service 'quickstart-ch'...
{"name":"INFORMATION_SCHEMA"}
{"name":"default"}
{"name":"information_schema"}
{"name":"system"}Piped output defaults to JSONEachRow; pass --format PrettyCompact for table-formatted output instead.
Create a database and table
clickhousectl cloud service query --id "$CH_ID" \
  --query "CREATE DATABASE IF NOT EXISTS helloworld"

clickhousectl cloud service query --id "$CH_ID" \
  --query "CREATE TABLE helloworld.my_first_table (
    user_id UInt32,
    message String,
    timestamp DateTime,
    metric Float32
  ) ENGINE = MergeTree()
  PRIMARY KEY (user_id, timestamp)"
Both commands print OK. Insert a few rows:
clickhousectl cloud service query --id "$CH_ID" \
  --query "INSERT INTO helloworld.my_first_table (user_id, message, timestamp, metric) VALUES
    (101, 'Hello, ClickHouse!', now(), -1.0),
    (102, 'Insert a lot of rows per batch', yesterday(), 1.41421),
    (102, 'Sort your data based on your commonly-used queries', today(), 2.718),
    (101, 'Granules are the smallest chunks of data read', now() + 5, 3.14159)"
Verify it worked:
clickhousectl cloud service query --id "$CH_ID" \
  --query "SELECT * FROM helloworld.my_first_table ORDER BY timestamp"
{"user_id":102,"message":"Insert a lot of rows per batch","timestamp":"2026-08-26 00:00:00","metric":1.41421}
{"user_id":102,"message":"Sort your data based on your commonly-used queries","timestamp":"2026-08-27 00:00:00","metric":2.718}
{"user_id":101,"message":"Hello, ClickHouse!","timestamp":"2026-08-27 10:41:28","metric":-1}
{"user_id":101,"message":"Granules are the smallest chunks of data read","timestamp":"2026-08-27 10:41:33","metric":3.14159}The timestamps depend on when you ran the insert, so yours will differ.
Load a CSV file
Suppose the following text is in a CSV file named data.csv:
102,This is data in a file,2022-02-22 10:43:28,123.45
101,It is comma-separated,2022-02-23 00:00:00,456.78
103,Use FORMAT to specify the format,2022-02-21 10:43:30,678.90
INSERT ... FORMAT reads the data from stdin, so pipe the query and the file together:
printf 'INSERT INTO helloworld.my_first_table FORMAT CSV\n' | cat - data.csv \
  | clickhousectl cloud service query --id "$CH_ID"
Verify the new rows landed:
clickhousectl cloud service query --id "$CH_ID" \
--query "SELECT count() FROM helloworld.my_first_table"{"count()":7}Connect with clickhouse client
You can also connect over the native protocol with clickhouse client. The ClickHouse CLI manages the clickhouse binary for you, so you don’t need a separate client install:
clickhousectl local use latestThis installs the latest clickhouse binary and symlinks it to ~/.local/bin/clickhouse, so the plain clickhouse command is available globally on your PATH.
Then connect using the hostname and password from the create response. With --query, the result is printed and the client exits; without it you get the interactive prompt (:)), which you leave with exit:
clickhouse client --host "$CH_HOST" --secure --port 9440 \
  --user default --password "$CH_PASSWORD" \
  --query "SELECT * FROM helloworld.my_first_table ORDER BY timestamp FORMAT TabSeparated"
102 Insert a lot of rows per batch 2026-08-26 00:00:00 1.41421
102 Sort your data based on your commonly-used queries 2026-08-27 00:00:00 2.718
101 Hello, ClickHouse! 2026-08-27 10:41:28 -1
101 Granules are the smallest chunks of data read 2026-08-27 10:41:33 3.14159
103 Use FORMAT to specify the format 2022-02-21 10:43:30 678.9
102 This is data in a file 2022-02-22 10:43:28 123.45
101 It is comma-separated 2022-02-23 00:00:00 456.78The same command form uploads files:
clickhouse client --host "$CH_HOST" --secure --port 9440 \
  --user default --password "$CH_PASSWORD" \
  --query='INSERT INTO helloworld.my_first_table FORMAT CSV' < data.csv
Cleanup
Deleting a service removes all of its data permanently. --force stops a running service first:
clickhousectl cloud service delete "$CH_ID" --forceTo keep the data but stop paying for compute, idle the service with clickhousectl cloud service stop "$CH_ID" instead.