

 Set up docs MCP
ClickHouse Cloud provides an easy way to import your files and supports the following formats:
| Format |
|---|
CSV |
CSVWithNamesAndTypes |
CSVWithNames |
JSONEachRow |
TabSeparated |
TabSeparatedWithNames |
TabSeparatedWithNamesAndTypes |
Upload a file
From the Cloud homepage, select your service as shown below:
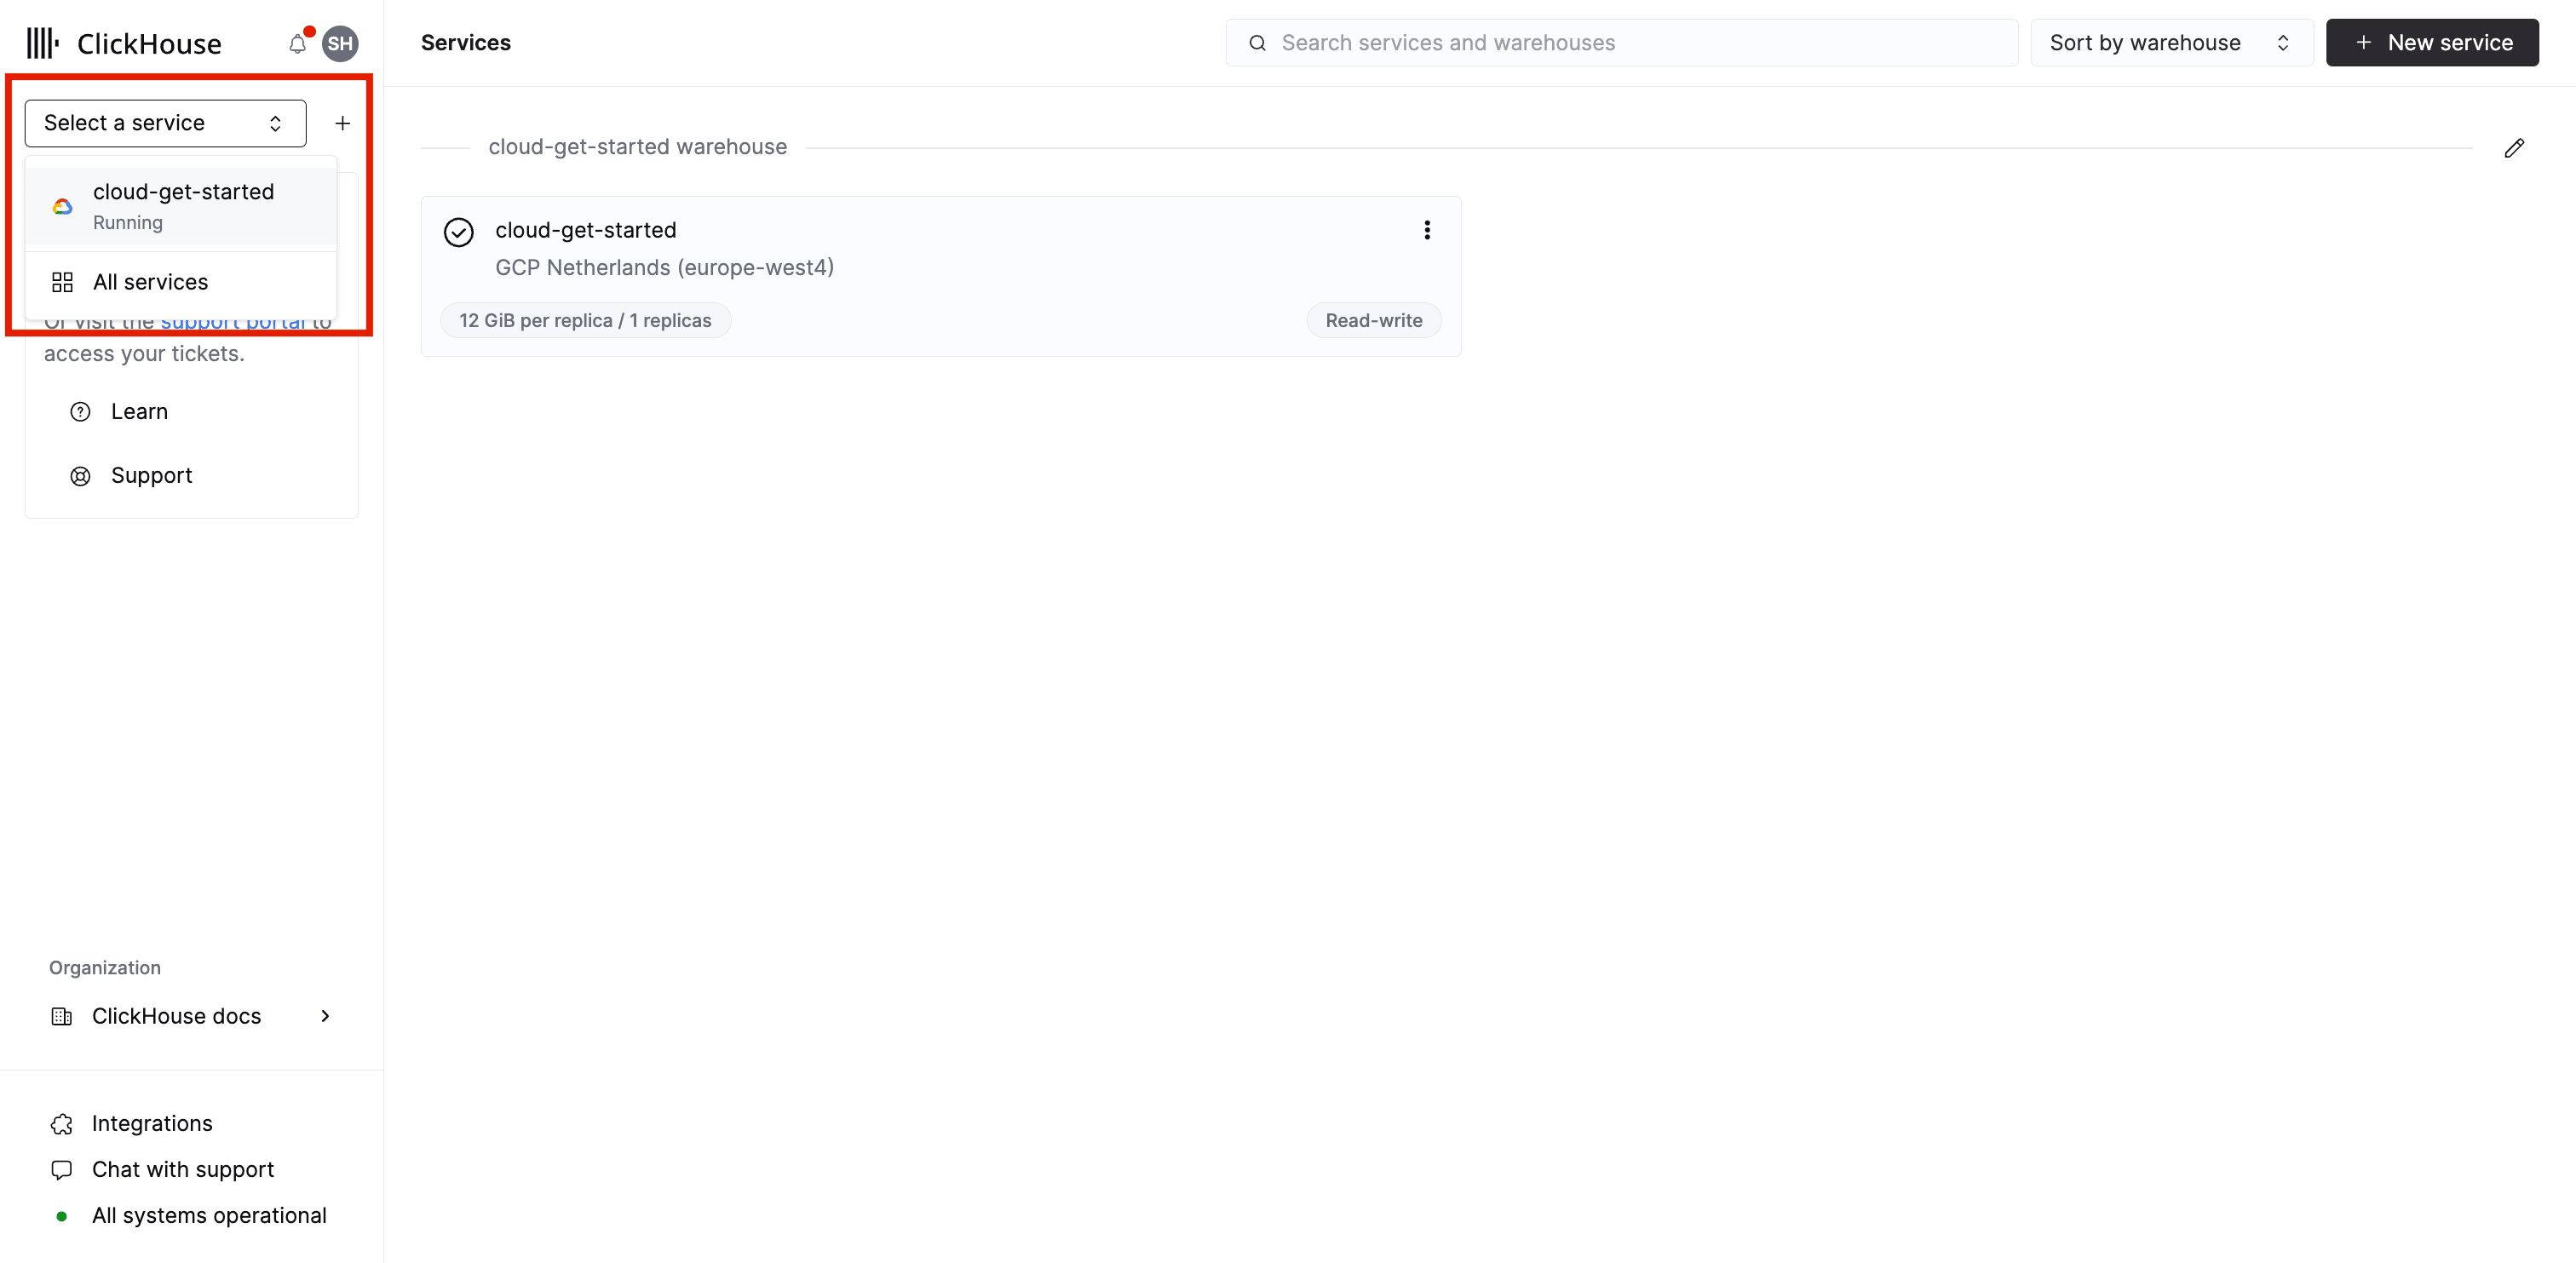
If your service is idle you will need to wake it.
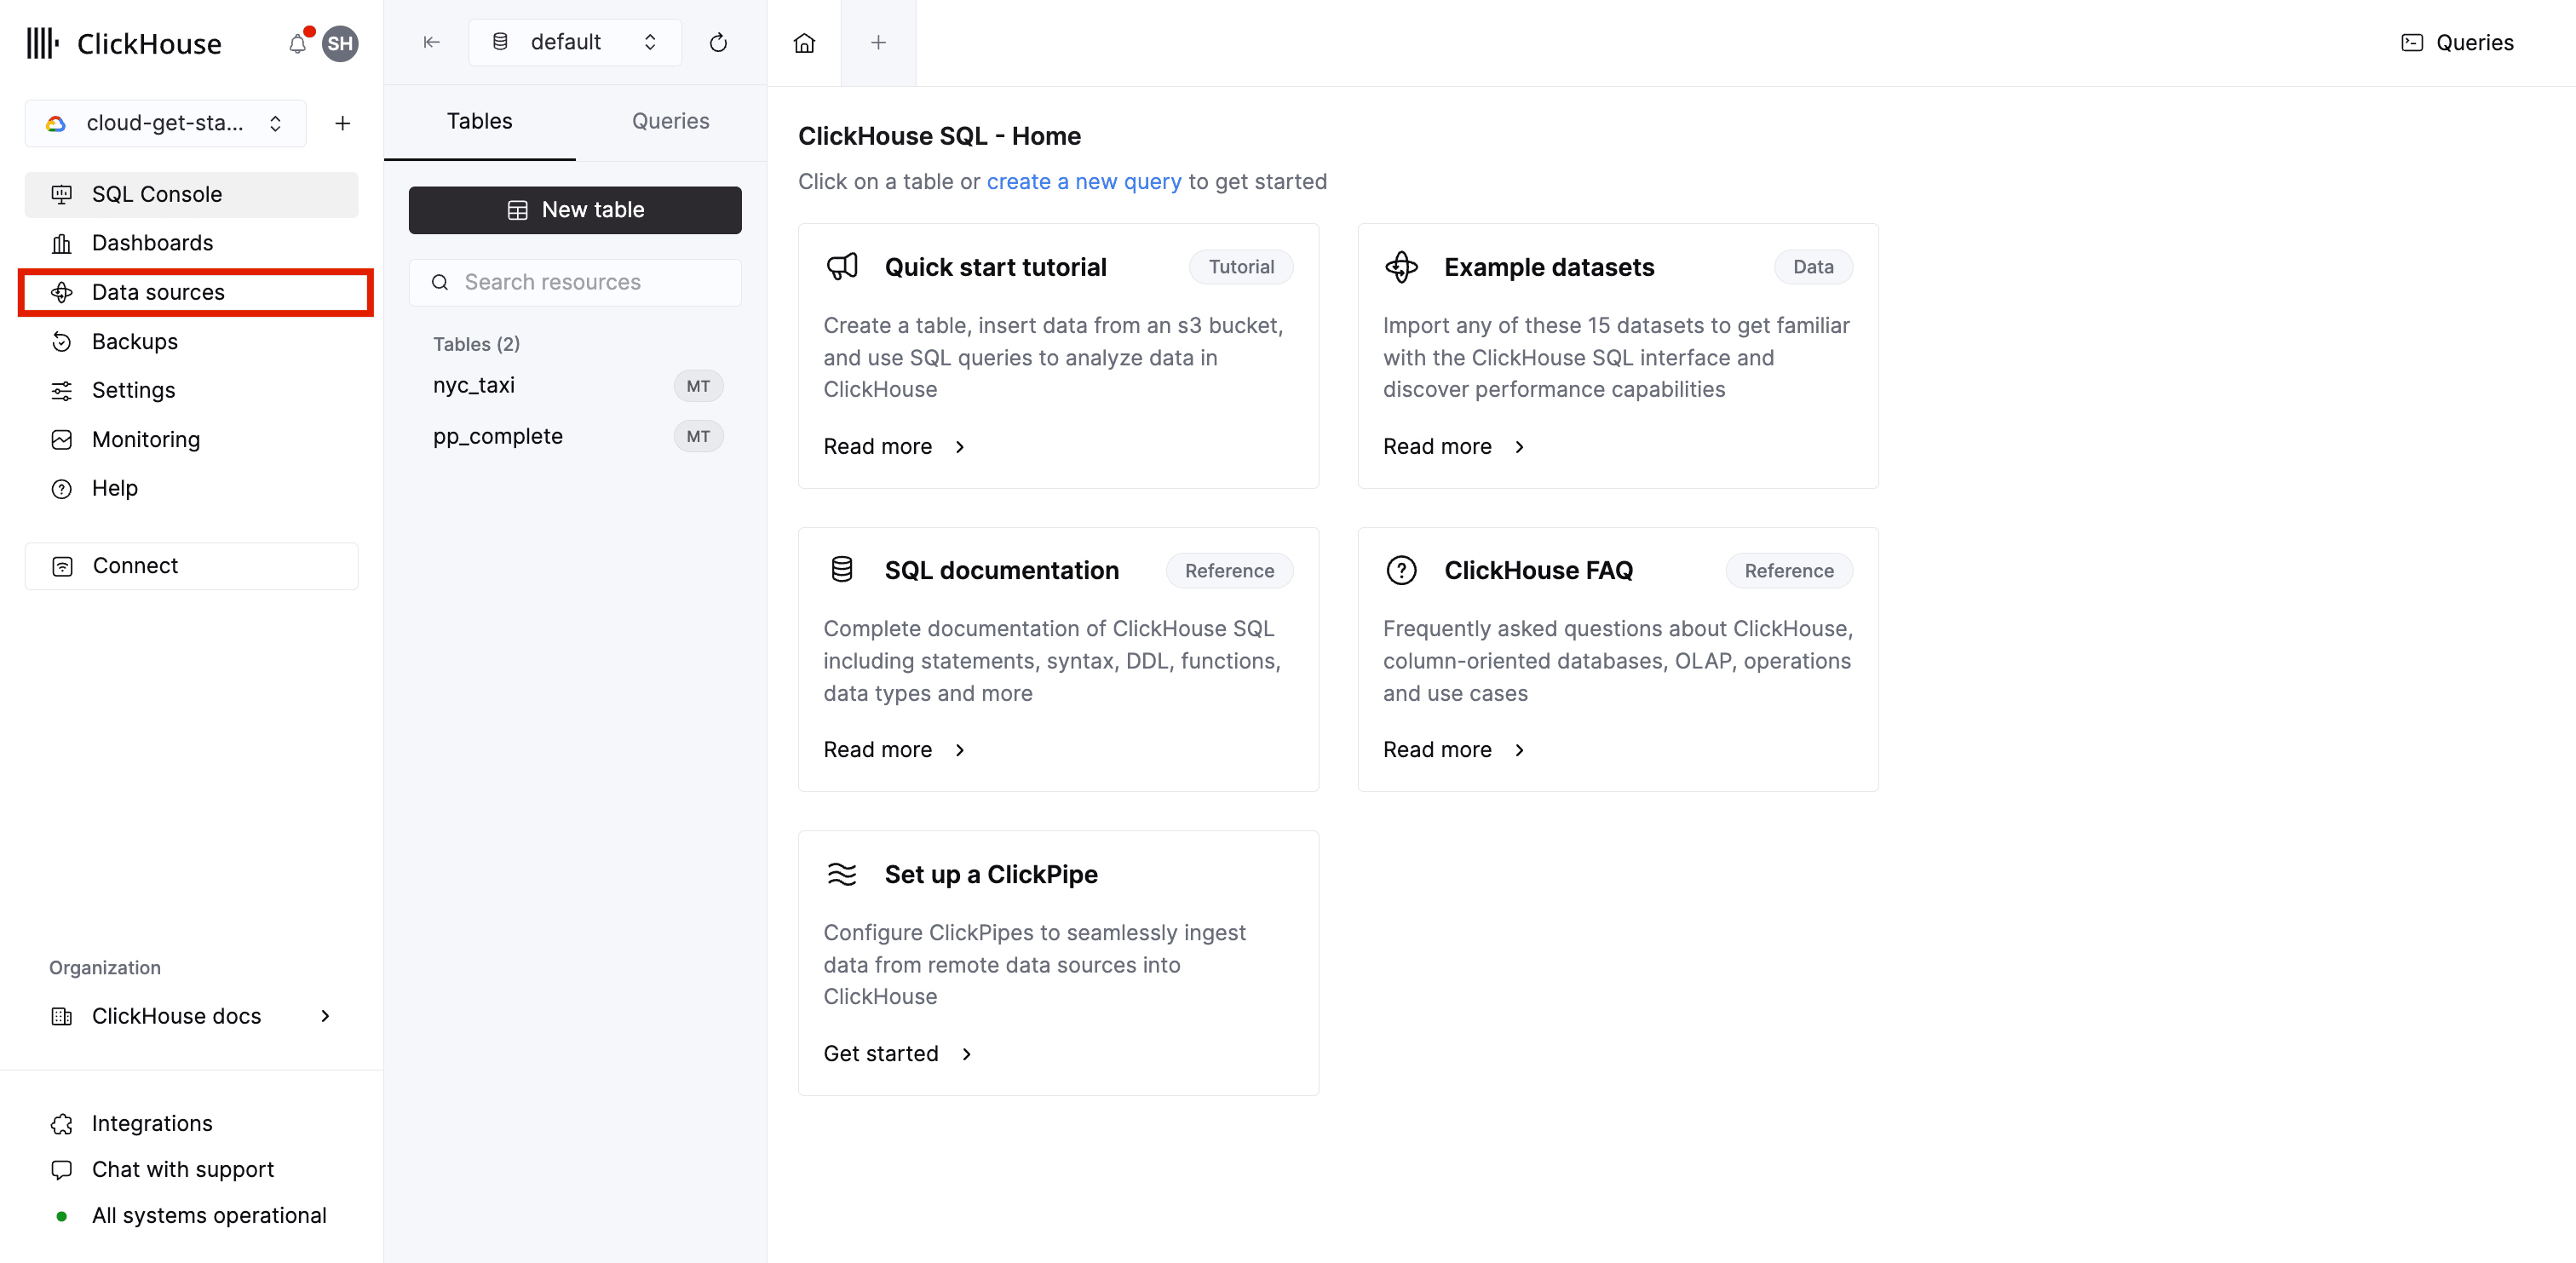
Select Data sources in the left hand tab as shown below:
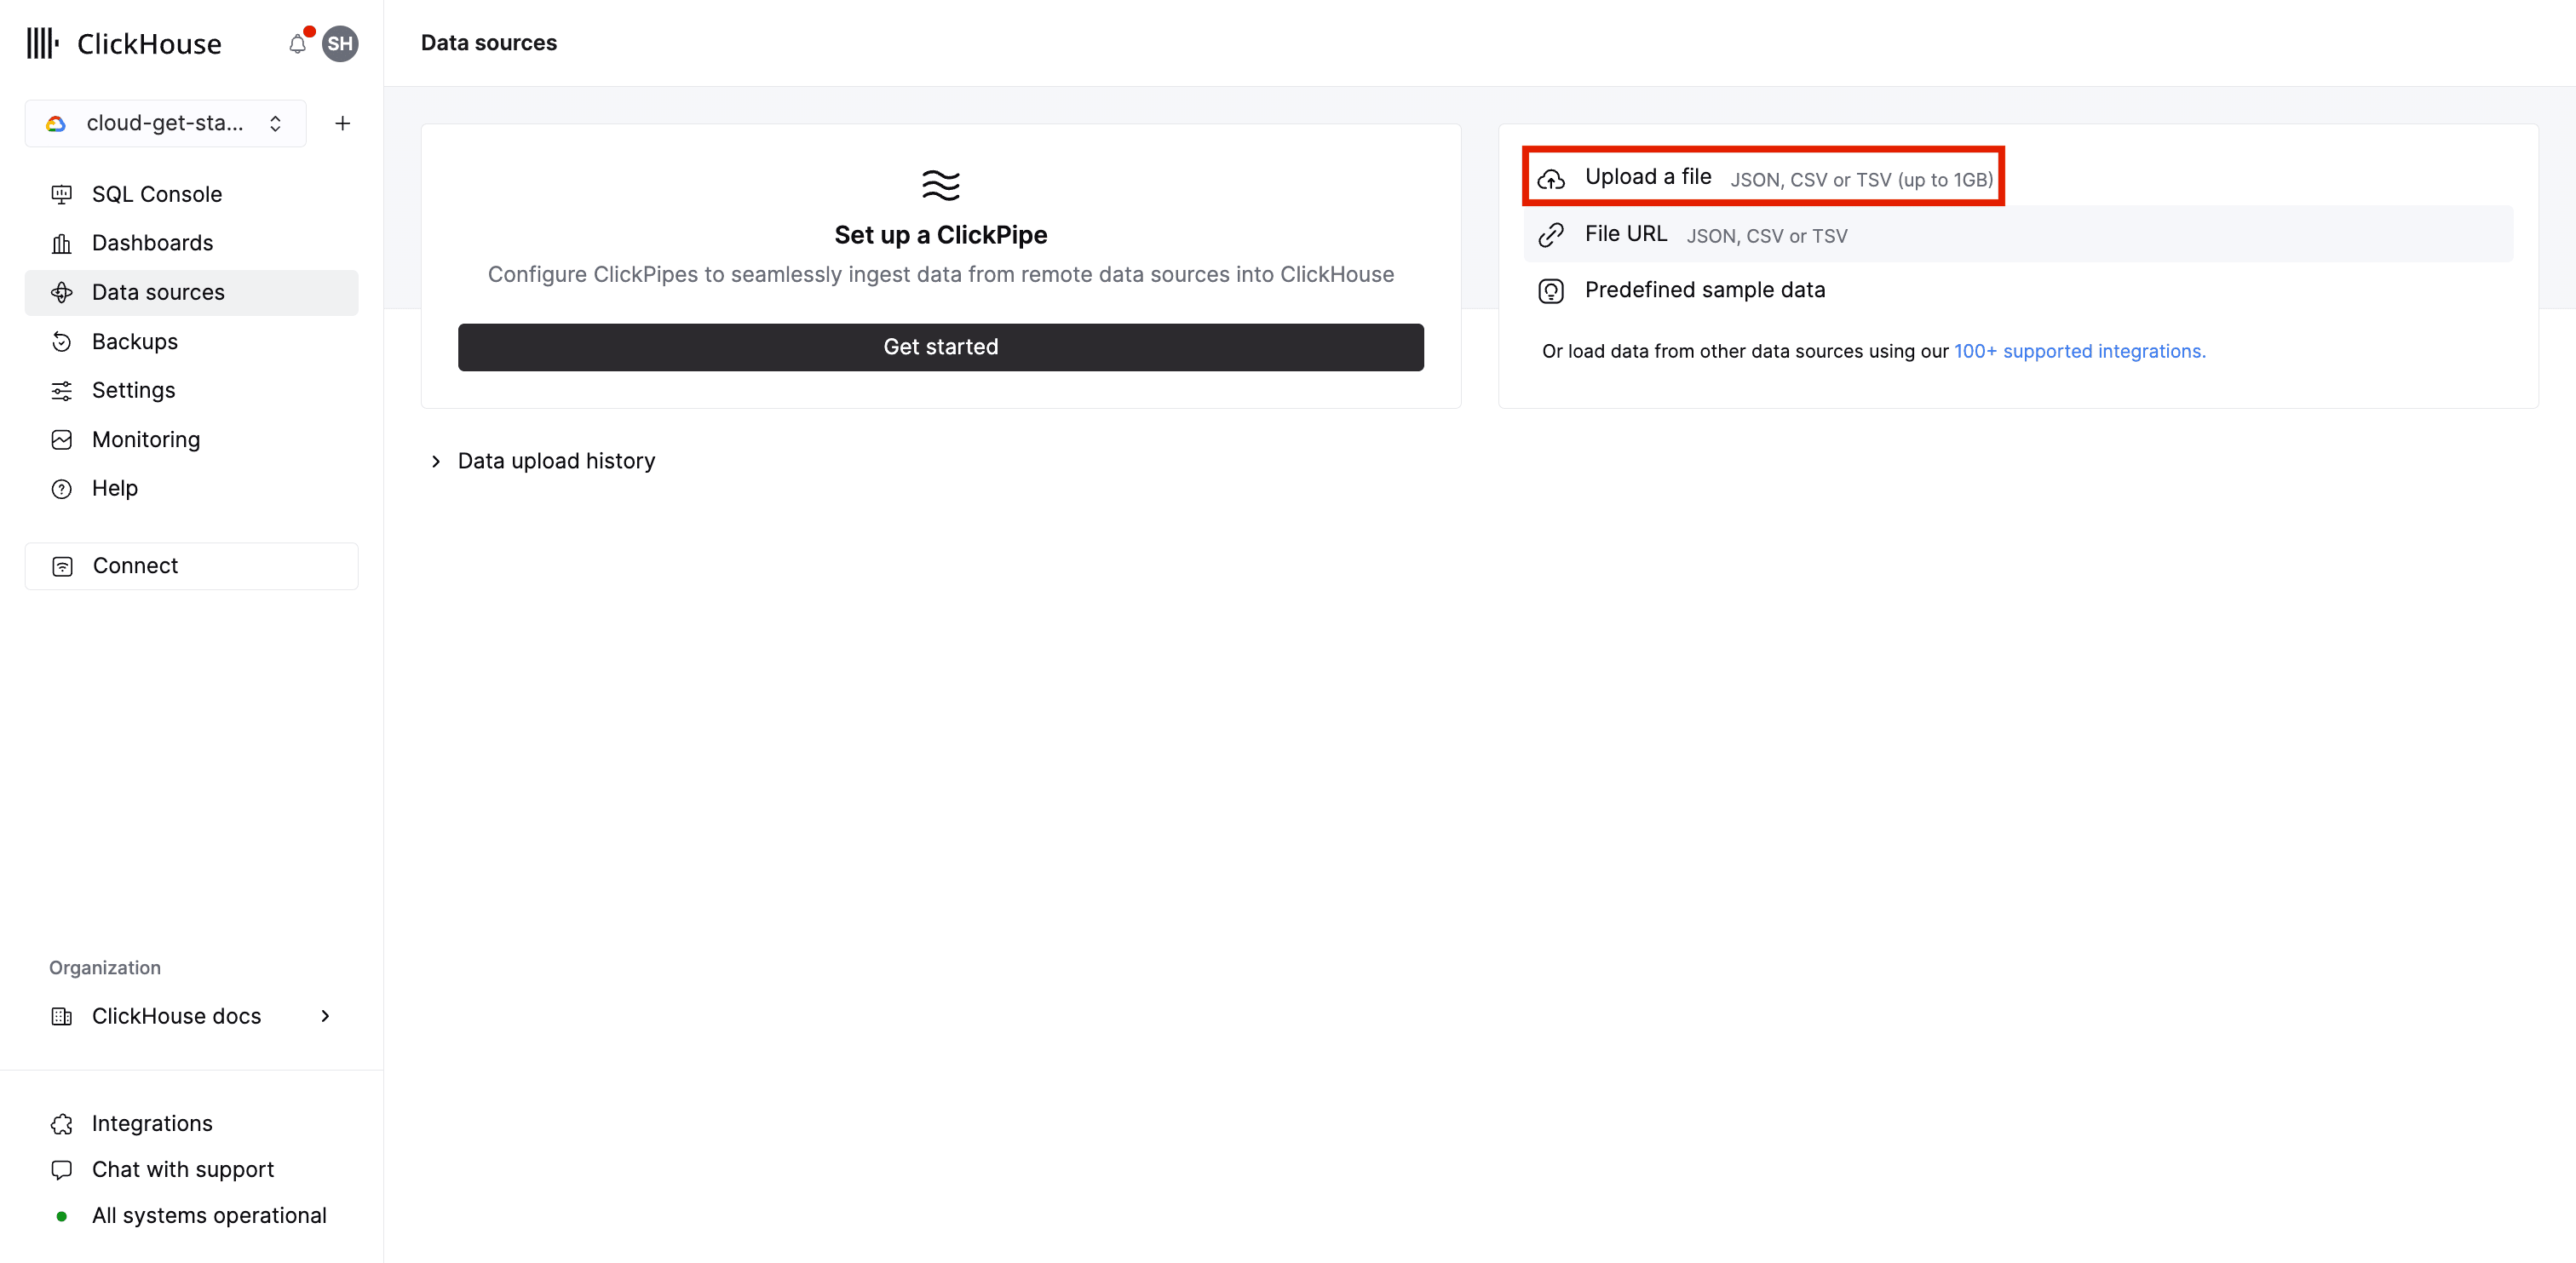
Next select Upload a file on the right side of the data sources page:
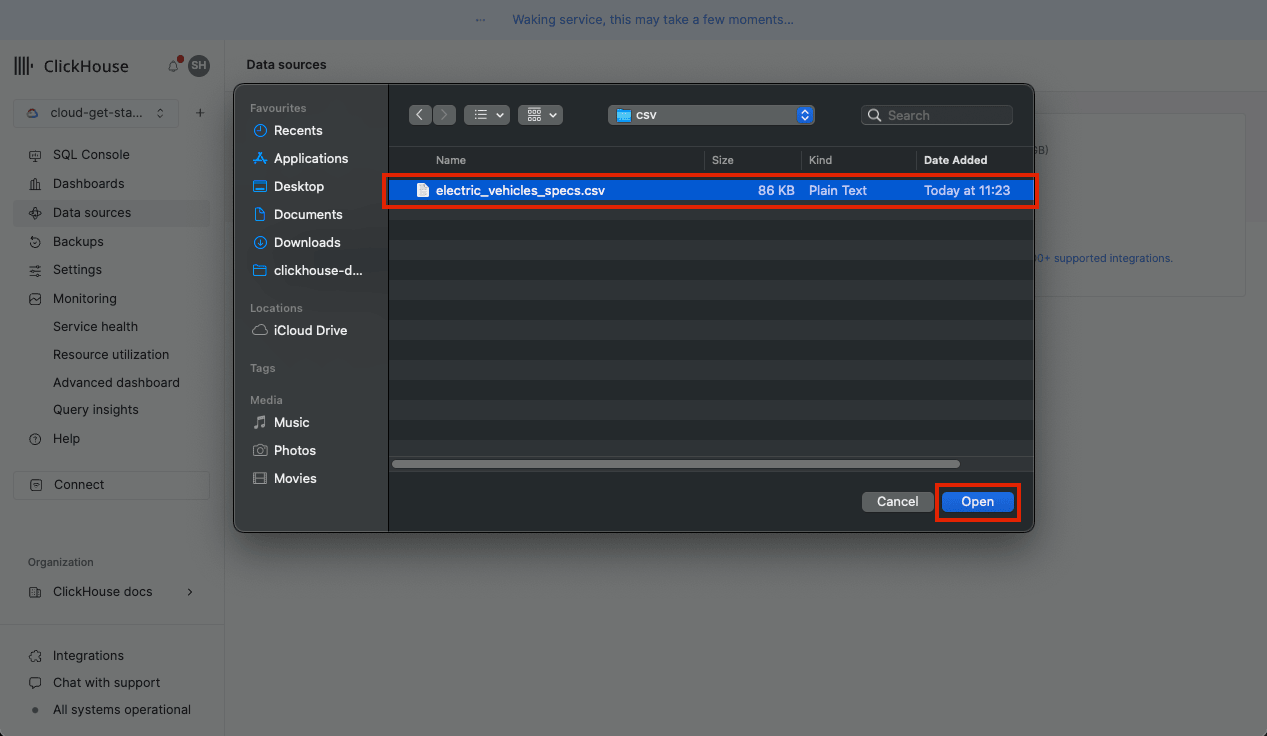
A file dialogue will pop up allowing you to select the file that you wish to use to insert data into a table on your Cloud service.
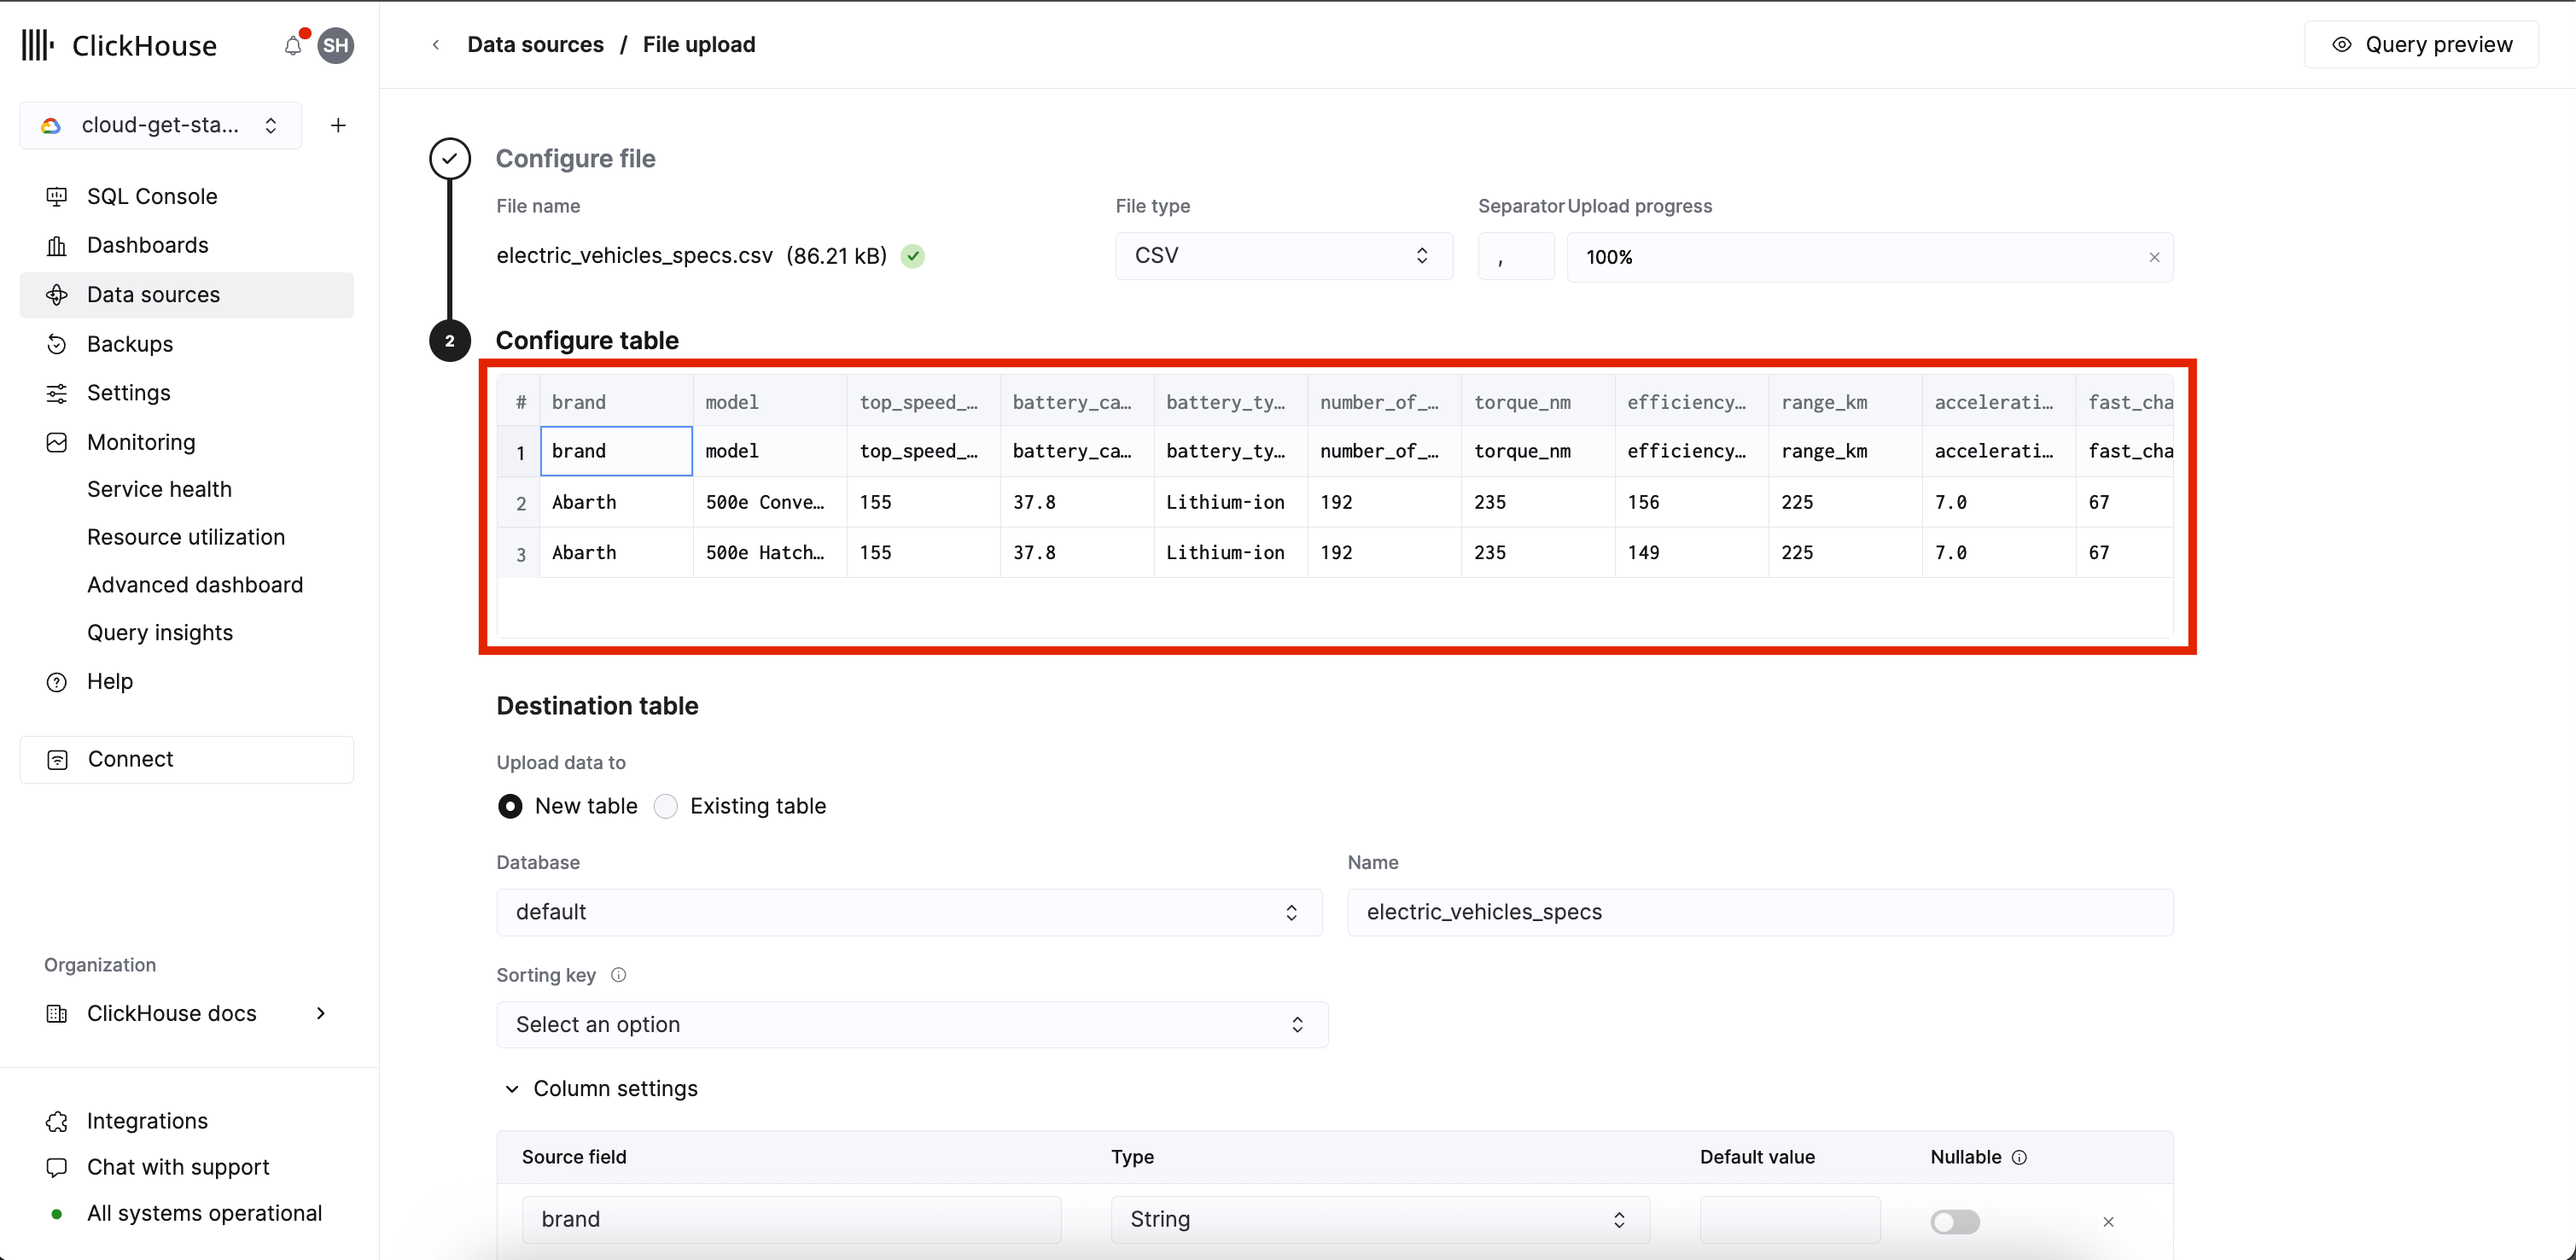
Configure table
Once the file has uploaded you will be able to configure the table where you want to insert the data to. A preview of the table with the first three rows is shown.
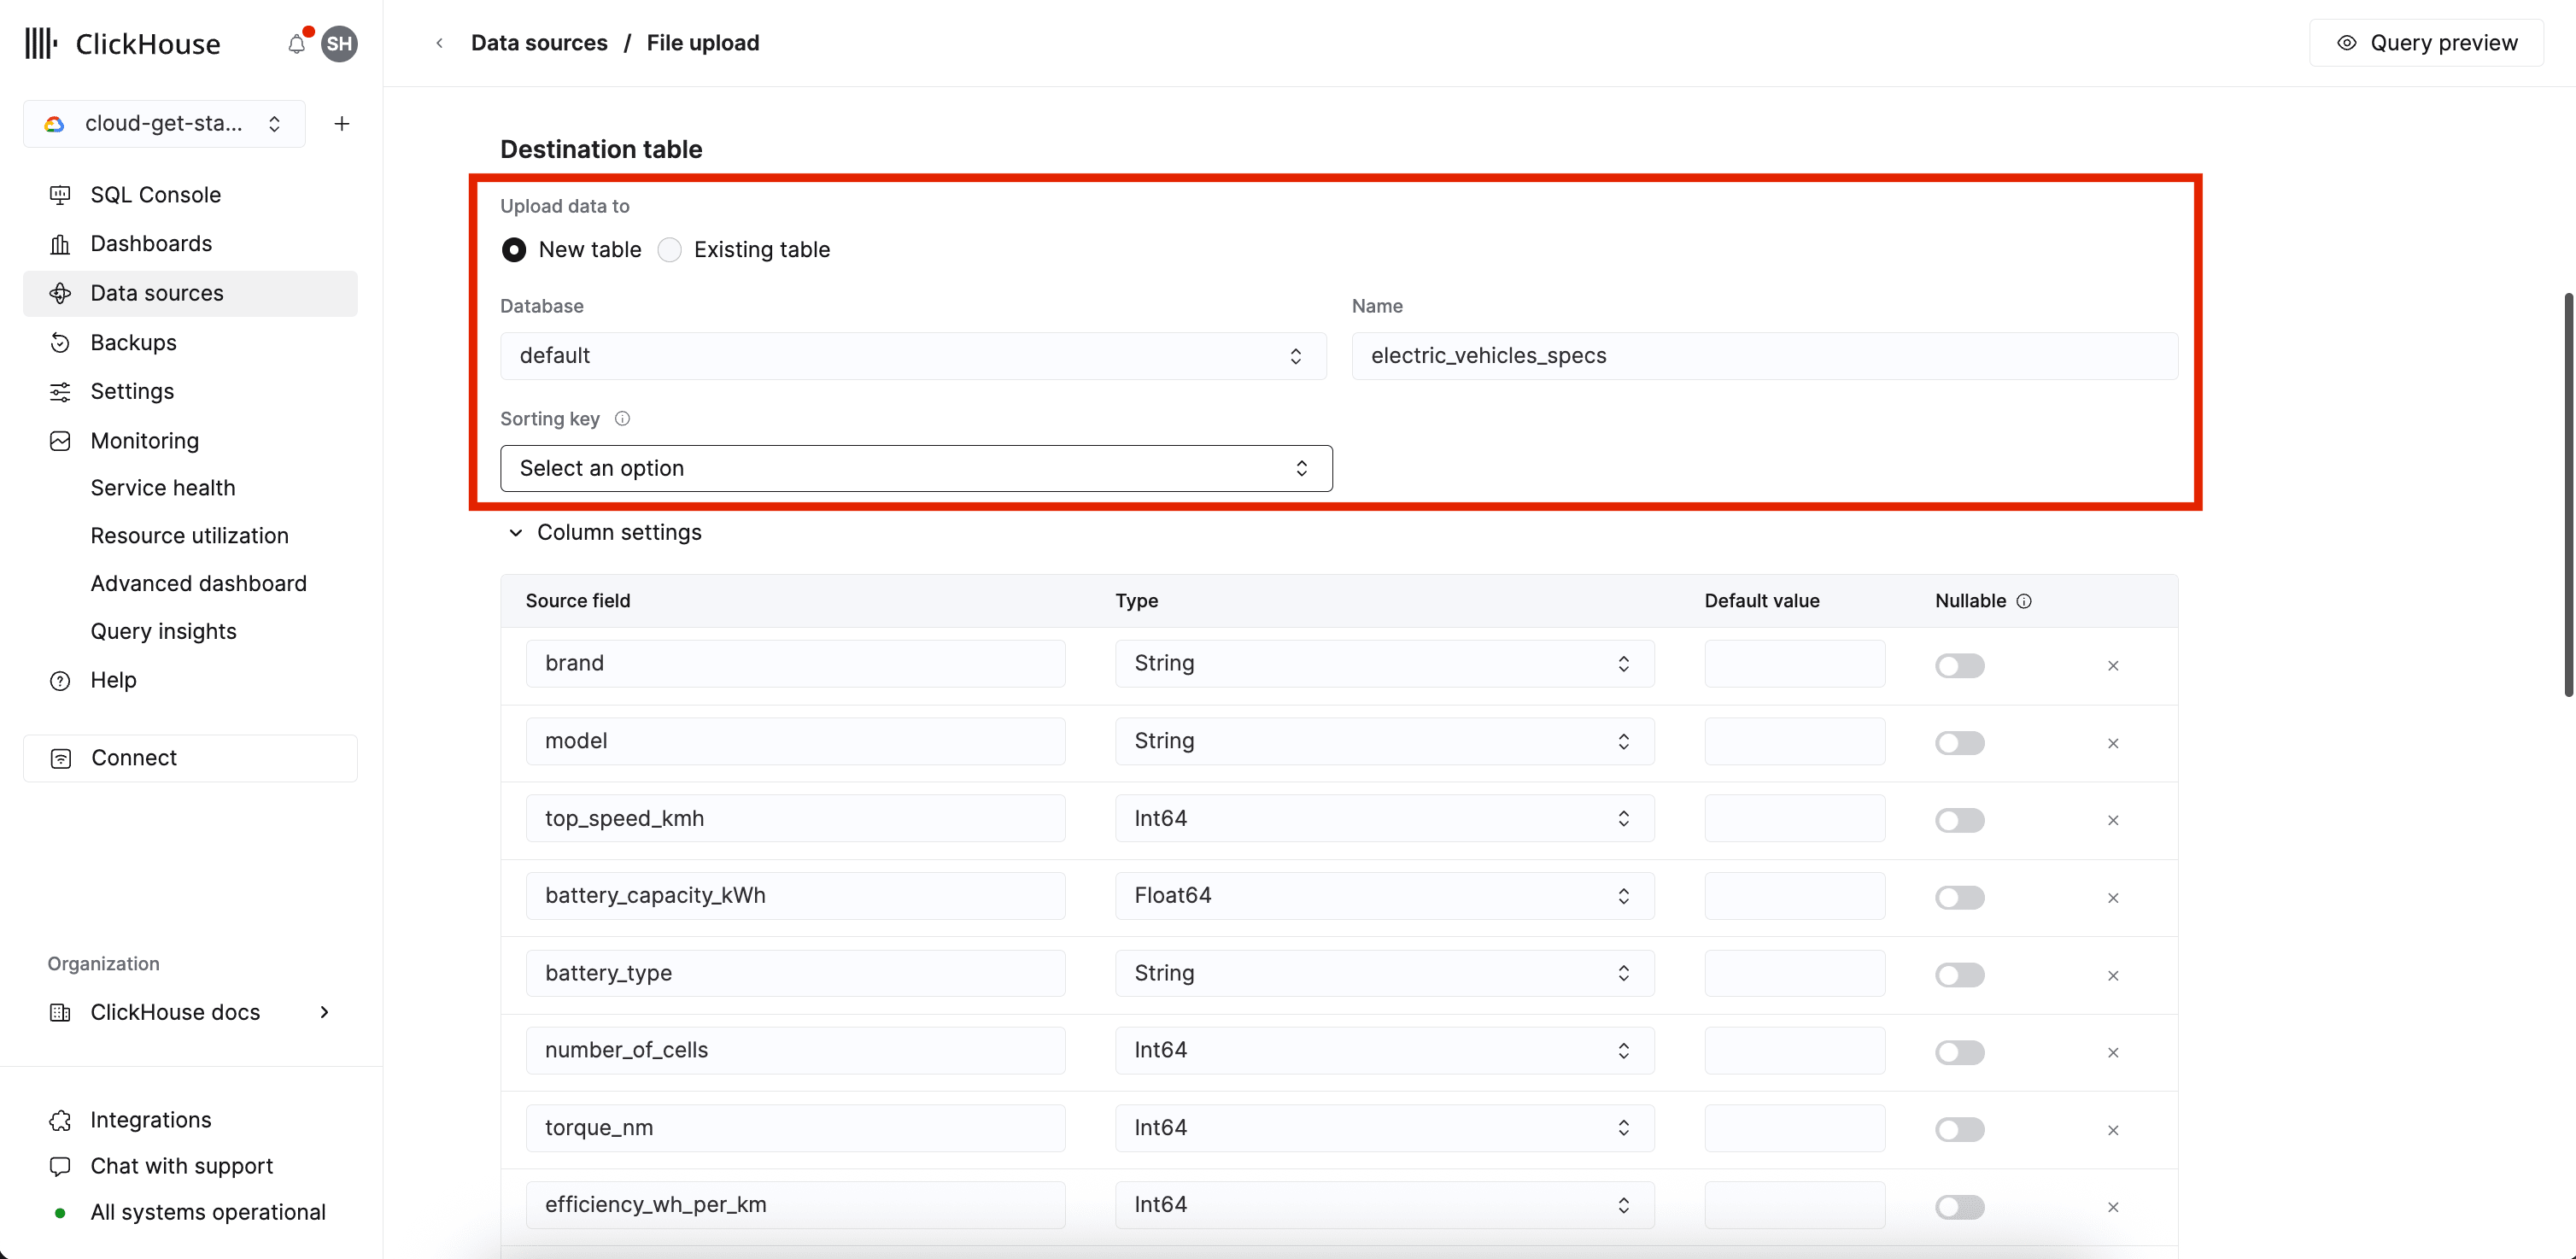
You can now select a destination table. The options are:
- a new table
- an existing table
You can specify which database you want to upload the data to, and in the case of a new table, the name of the table that will be created. You will also be able to select the sorting key:
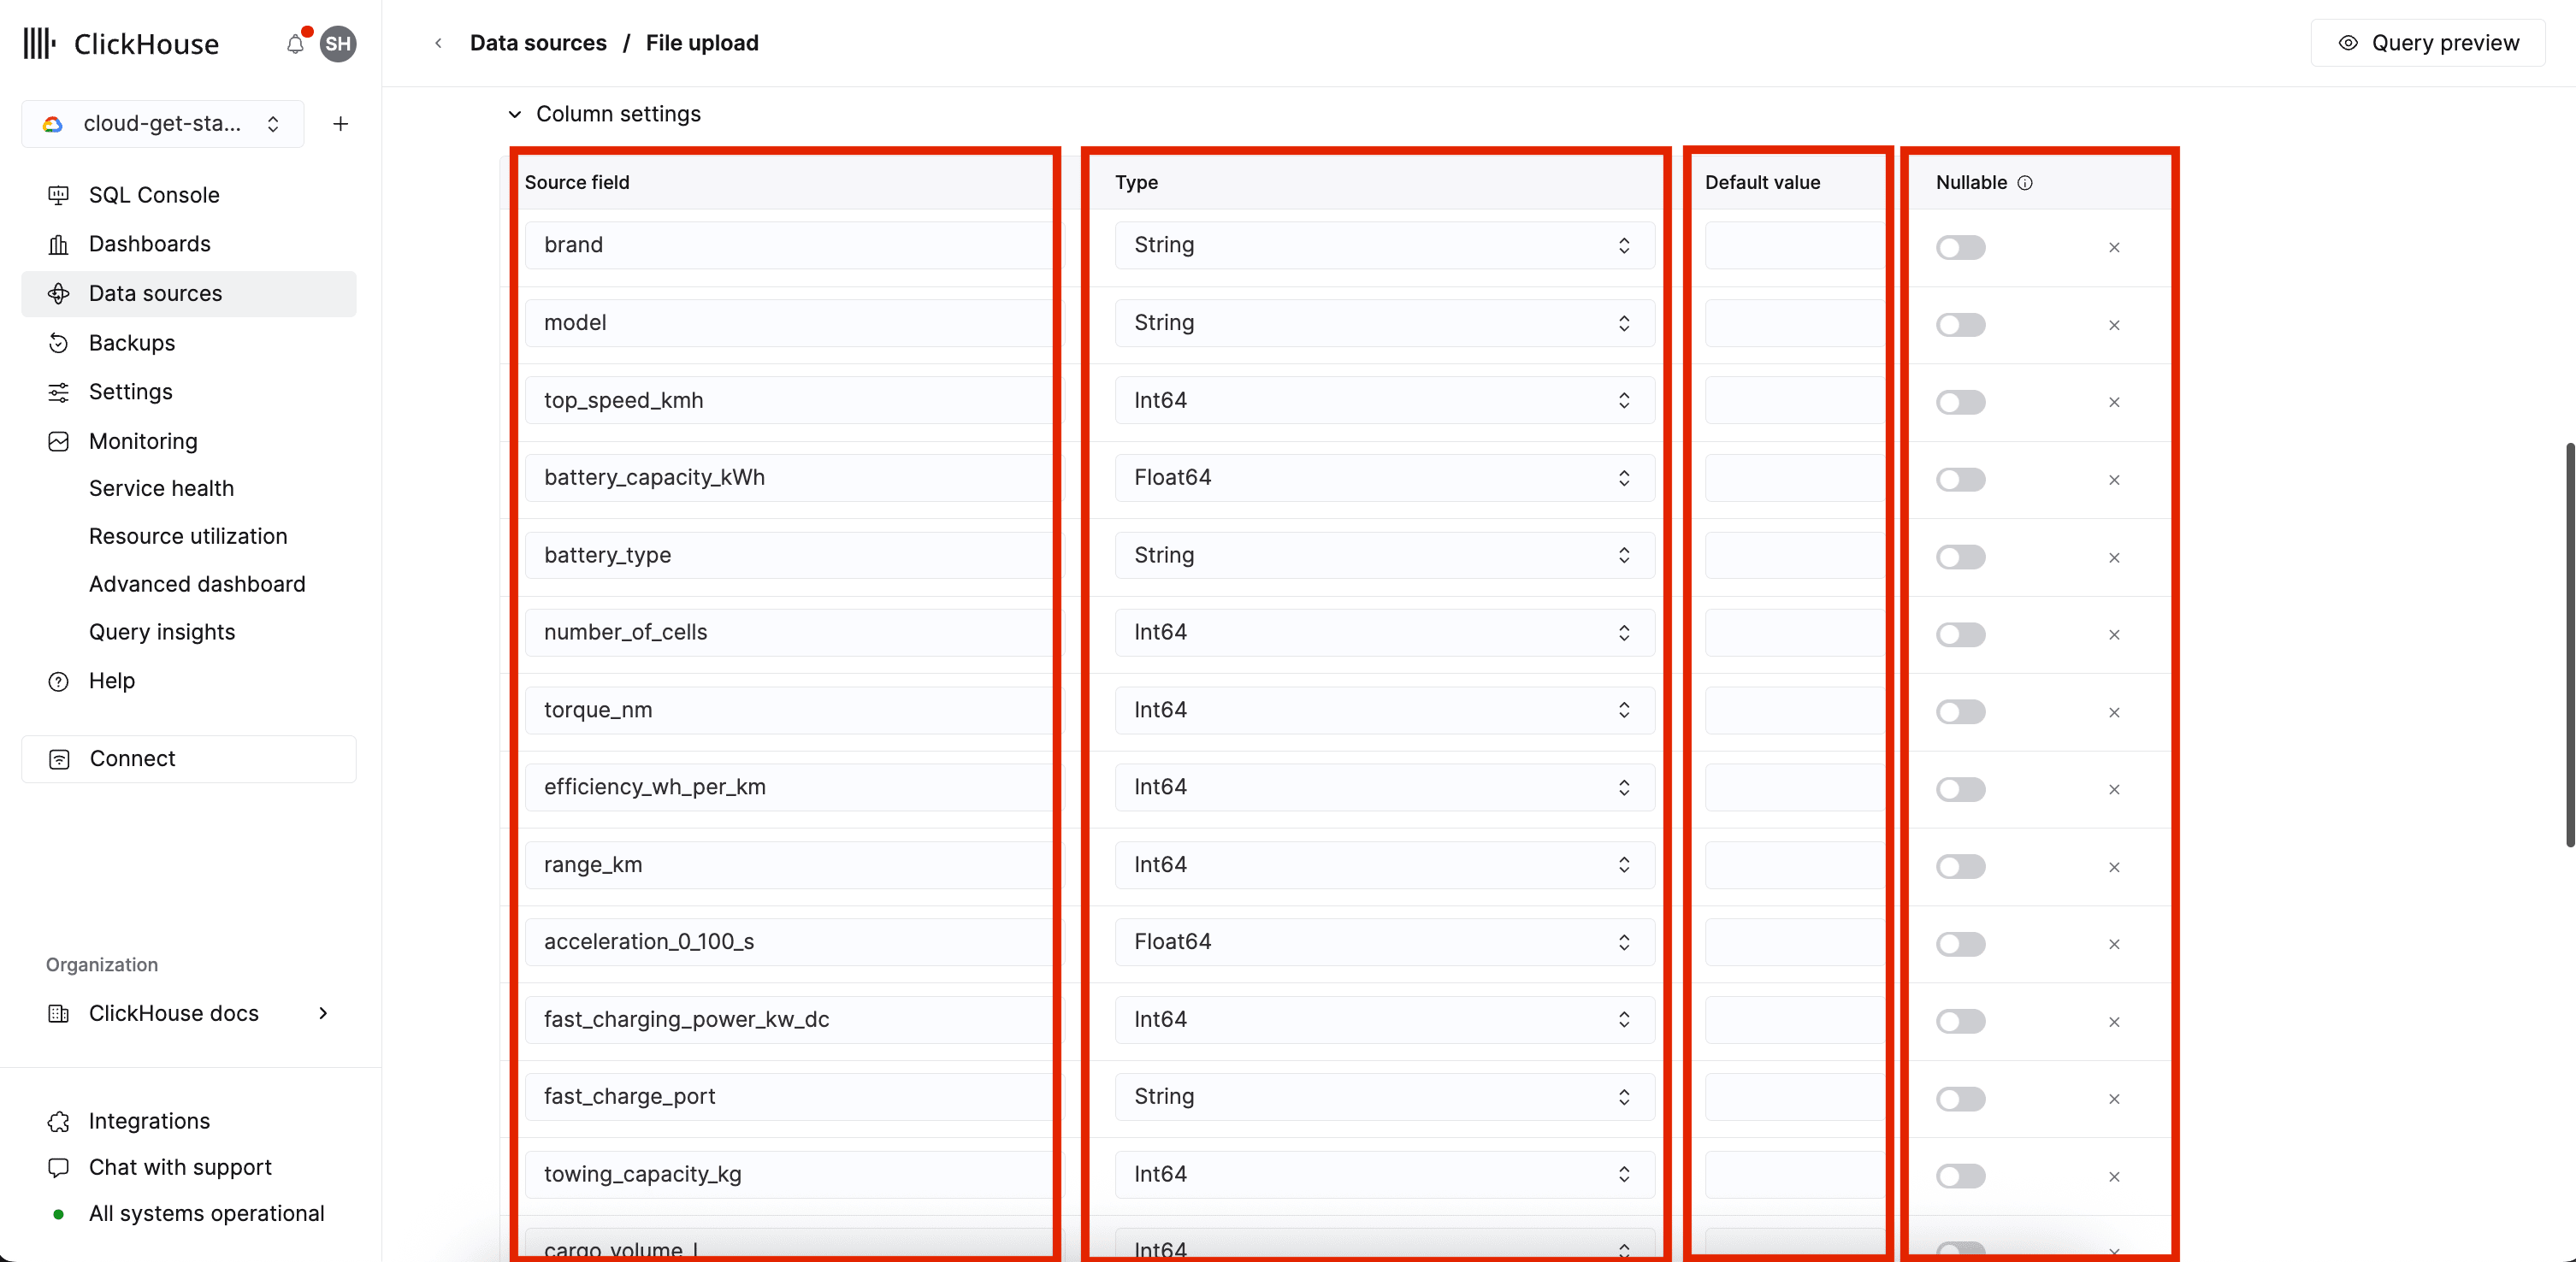
Columns read from the file are shown as Source fields and for each field, you
can change:
- the inferred type
- the default value
- whether to make the column Nullable or not
You can specify the type of table engine that you want to use:
MergeTreeReplacingMergeTreeSummingMergeTreeNull
You can specify a partitioning key expression and primary key expression.
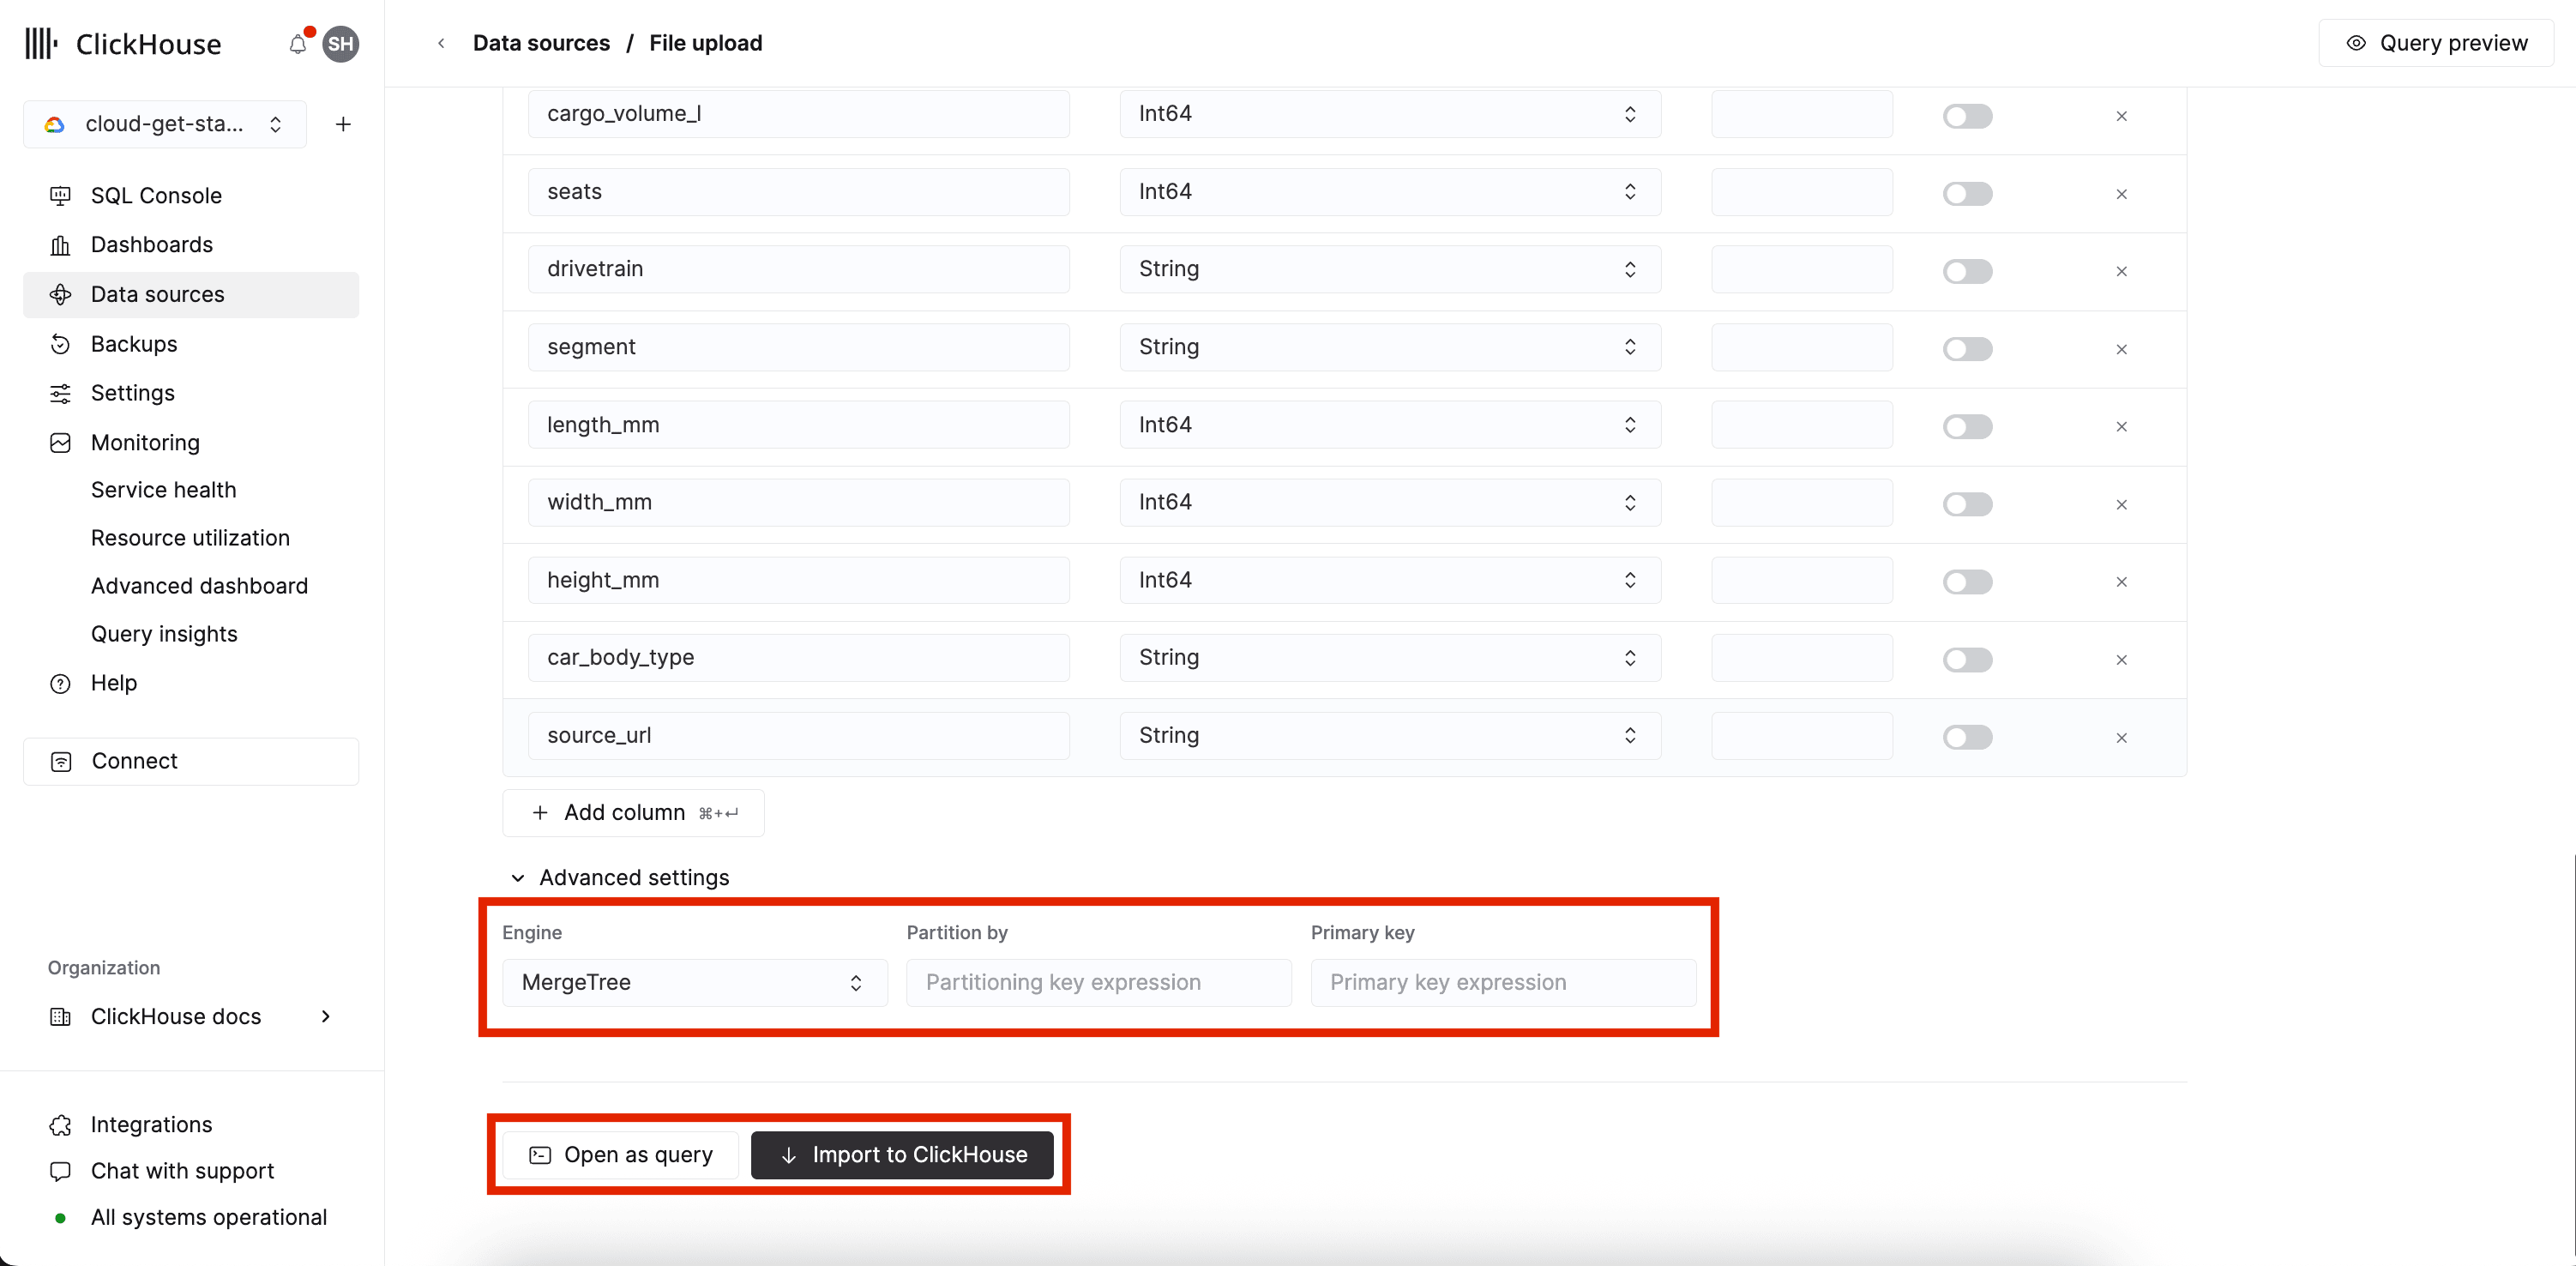
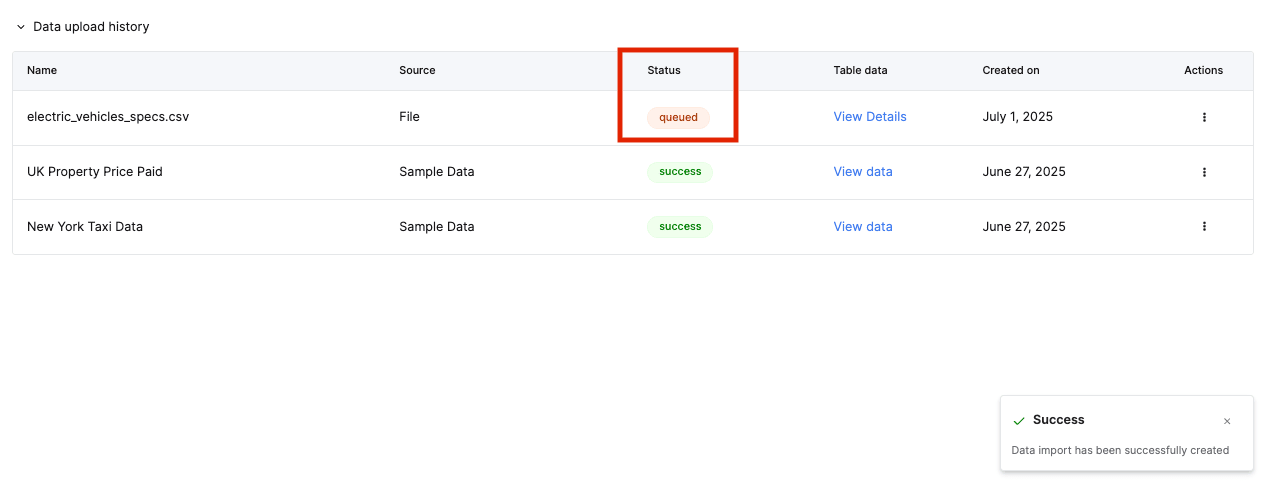
Click Import to ClickHouse (shown above) to import the data. The data import will be queued as
indicated by the queued status badge in the Status column as shown below. You can also click
Open as query (shown above) to open the insert query in the SQL console. The query will insert
the file which was uploaded to an S3 bucket using the URL table function.
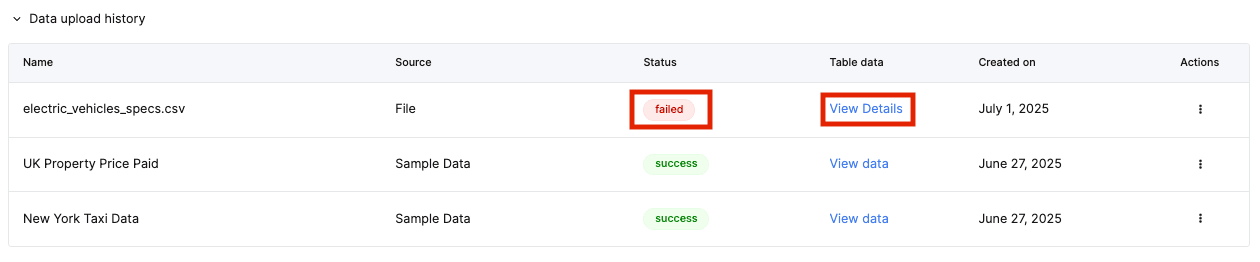
If the job fails you will see a failed status badge under the Status column of
the Data upload history tab. You can click View Details for more information
on why the upload failed. You may need to modify the table configuration or clean
the data based on the error message for the failed insert.
You can follow this path yourself, script it, or hand it to an AI agent. Switch to the Cloud UI view for the console version.
This page covers uploading a local file (for example, a CSV) into a table on a ClickHouse Cloud service from the command line with the ClickHouse CLI (clickhousectl). The flow mirrors the console’s file-upload wizard: inspect the file’s schema, create the destination table, and insert the file over HTTP with the Query API — no clickhouse binary or service password required.
Prerequisites
Install the ClickHouse CLI:
curl https://clickhouse.com/cli | shYou also need jq.
Write operations require API key authentication; OAuth login is read-only:
clickhousectl cloud auth login --api-key <YOUR_KEY> --api-secret <YOUR_SECRET>Verify with clickhousectl cloud auth status; expect an entry with scope read/write.
Pick a service
This guide assumes you already have a running service. If you don’t, see the Cloud quick start for creating one from the CLI. Look up the ID of your service by name:
CH_ID=$(clickhousectl cloud service list --json \
  | jq -r '.[] | select(.name=="my-service") | .id')
Prepare the file
Suppose the following text is in a CSV file named data.csv. The first line is a header row, so the matching input format is CSVWithNames:
user_id,url,visited_at,duration_ms
101,https://clickhouse.com/docs,2026-08-14 09:15:32,4210
102,https://clickhouse.com/pricing,2026-08-14 09:16:01,1830
101,https://clickhouse.com/cloud,2026-08-14 09:17:45,2650
103,https://clickhouse.com/blog,2026-08-15 11:02:10,980
102,https://clickhouse.com/docs/cloud,2026-08-15 11:05:44,3120
Inspect the schema
Where the console wizard shows you the inferred type of each source field, the CLI equivalent is DESCRIBE on the format table function with a sample of the file inlined:
clickhousectl cloud service query --id "$CH_ID" --format PrettyCompact \
  --query "DESCRIBE format(CSVWithNames, '$(head -n 3 data.csv)')"
The first query call provisions a Query API endpoint and a service-scoped API key for the service automatically:
Provisioning Query API endpoint + key for service 'my-service'...
   ┌─name────────┬─type───────────────┬─default_type─┬─default_expression─┬─comment─┬─codec_expression─┬─ttl_expression─┐
1. │ user_id     │ Nullable(Int64)    │              │                    │         │                  │                │
2. │ url         │ Nullable(String)   │              │                    │         │                  │                │
3. │ visited_at  │ Nullable(DateTime) │              │                    │         │                  │                │
4. │ duration_ms │ Nullable(Int64)    │              │                    │         │                  │                │
   └─────────────┴────────────────────┴──────────────┴────────────────────┴─────────┴──────────────────┴────────────────┘
The sample is spliced into a SQL string literal, so it must not contain single quotes or backslashes; for files where it does, escape them or just write the CREATE TABLE by hand.
Create the table
Everything the wizard’s “Configure table” step offers — adjusting the inferred types, nullability, defaults, excluded fields, the table engine, and the sorting, partitioning, and primary key expressions — is a plain CREATE TABLE here. For example, tightening the inferred types and picking a sorting key:
clickhousectl cloud service query --id "$CH_ID" \
  --query "CREATE TABLE default.website_visits (
    user_id UInt32,
    url String,
    visited_at DateTime,
    duration_ms UInt32
  ) ENGINE = MergeTree
  ORDER BY (user_id, visited_at)"
The command prints OK. To load into an existing table instead, skip this step.
Upload the file
INSERT ... FORMAT reads the data from stdin, so pipe the query and the file together:
printf 'INSERT INTO default.website_visits FORMAT CSVWithNames\n' | cat - data.csv \
  | clickhousectl cloud service query --id "$CH_ID"
The command prints OK.
Verify the rows landed:
clickhousectl cloud service query --id "$CH_ID" --json \
--query "SELECT count() FROM default.website_visits"{"count()":5}clickhousectl cloud service query --id "$CH_ID" --format PrettyCompact \
--query "SELECT * FROM default.website_visits ORDER BY visited_at" ┌─user_id─┬─url───────────────────────────────┬──────────visited_at─┬─duration_ms─┐
1. │ 101 │ https://clickhouse.com/docs │ 2026-08-14 09:15:32 │ 4210 │
2. │ 102 │ https://clickhouse.com/pricing │ 2026-08-14 09:16:01 │ 1830 │
3. │ 101 │ https://clickhouse.com/cloud │ 2026-08-14 09:17:45 │ 2650 │
4. │ 103 │ https://clickhouse.com/blog │ 2026-08-15 11:02:10 │ 980 │
5. │ 102 │ https://clickhouse.com/docs/cloud │ 2026-08-15 11:05:44 │ 3120 │
└─────────┴───────────────────────────────────┴─────────────────────┴─────────────┘Other file formats
The same pattern works for any input format ClickHouse supports — including all the formats the console’s upload wizard accepts, such as CSV, JSONEachRow, and TabSeparatedWithNames. For another format, change the format name consistently in both the DESCRIBE format(...) schema-inference step and the INSERT ... FORMAT statement, and use a sample file that matches that format (a TSV sample for TabSeparatedWithNames, a JSON-lines sample for JSONEachRow, and so on). For example, the upload step for a TSV file becomes:
printf 'INSERT INTO default.website_visits FORMAT TabSeparatedWithNames\n' | cat - data.tsv \
  | clickhousectl cloud service query --id "$CH_ID"
Cleanup
If this was a trial run, drop the table to remove the imported data:
clickhousectl cloud service query --id "$CH_ID" \
  --query "DROP TABLE default.website_visits"